
020 3886 1874

GeoDomeX (3.5m) Pod

GeoDomeX (3.5m) Pod

What do you need help with?

Up to 5-Year Part Warranty

Find out more about whats covered in your replacement part warranty.

Need Replacement Parts?

Click here to quickly and easily buy replacement parts for your dome.

Download Guides

Lost or misplaced your guide? Get a digital copy you can print here.

Title

Unboxing

What's inside your box.

Here you’ll find a complete list of all of the components that make up your GeoDomeX. Each panel and strip is numbered, to support easy identification, allowing you to easily switch out panels should you need to. Use this part list as a reference to ensure you have everything before you get started on assembly. If you find you have any broken or missing parts, you can request for replacements by clicking here.

Box 1

Box 2

Take care when unpacking. Some parts are packaged under tension, so will spring apart when opened. These parts are labelled with a warning sticker. When opening theses parts, point them away from your face and other people.

Title

Assembly

How to build your dome.

This guide takes you through the process of assembling your dome from start to finish. Each step provides guidance on the necessary actions, the required components, and our recommended tips to keep each step as simple as possible. If you need any support during the assembly, you can get in touch with us. We’re more than happy to help talk you through the process.

Assembly walkthrough video

Alt image

Discover everything you need to know about assembling your GeoDomeX with our informative video walkthrough and follow along as we guide you through the step-by-step process.

Video Chapters

00:21 - Preparing your space
00:56 - Unboxing your GeoDomeX
01:54 - Tips before getting started
02:48 - Assembling your GeoDomeX

Animated assembly video

Alt image

Watch the assembly animation for a detailed and easy-to-follow guide on how to put together your GeoDomeX.

Preparing your space

Make sure you have a space of at least 3.55m by 3.55m to build your dome. Ensure that the ground type is completely level to ensure that the door will function correctly.

A stepladder may be useful during the build, so have this to hand before you get started.

You may find it helpful to layout all the panels prior to starting the assembly. Each panel has a unique number engraved at the top (the numbers can be found at one end of any strips). These numbers need to always be readable from the outside of the dome.

Screws can be tightened by hand, though we do provide a screwdriver to help you do this. An electric screwdriver can be used, but always ensure you are using the lowest torque setting to prevent over-tightening the screws as this can cause damage to the screw-threads and panels.

We recommend 2+ people for an easier and faster assembly experience.

To reduce fingerprints on the panels during assembly, the plastic protection can be removed at the end, just make sure to remove it from the screw holes (on both sides of the panel) as you go.

Step by step guidance
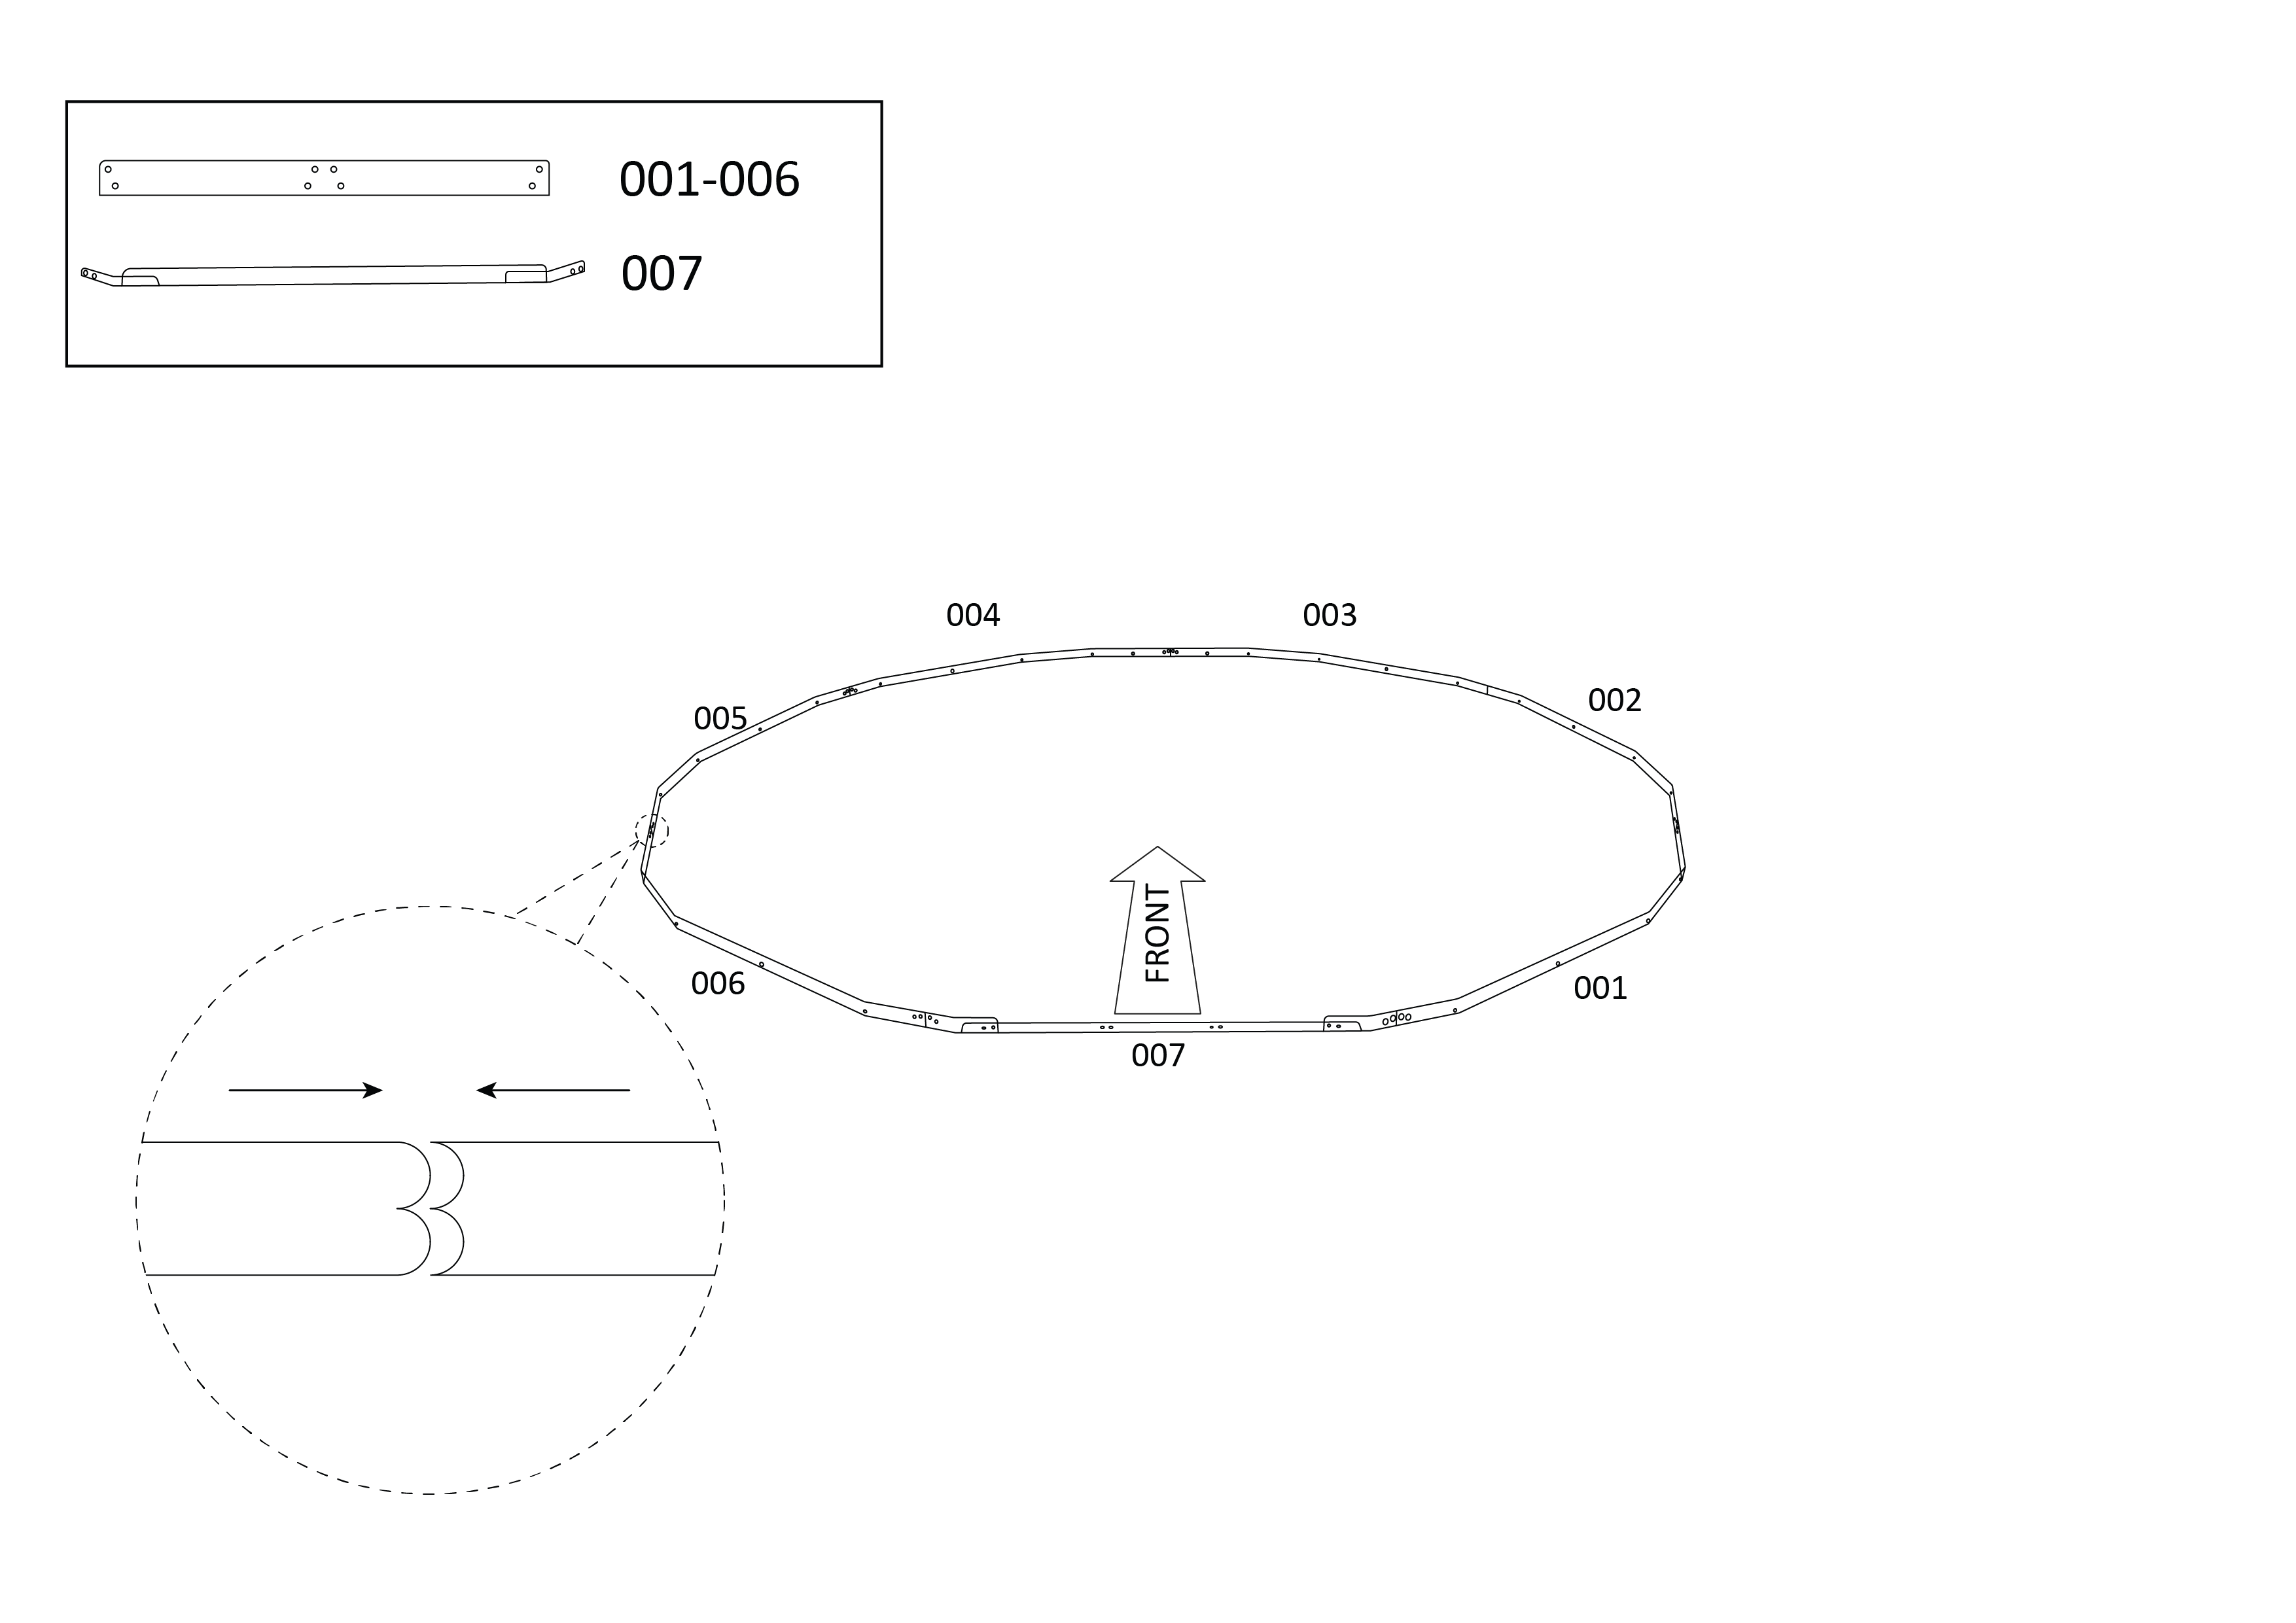
1. Take strips 001-007 and lay them in order, ensuring 007 is placed where you want your door to be located. Each end of the strips is shaped in a different way, allowing you to match them up more easily.

NB: Make sure the numbers on the strips are readable from the outside of the dome.

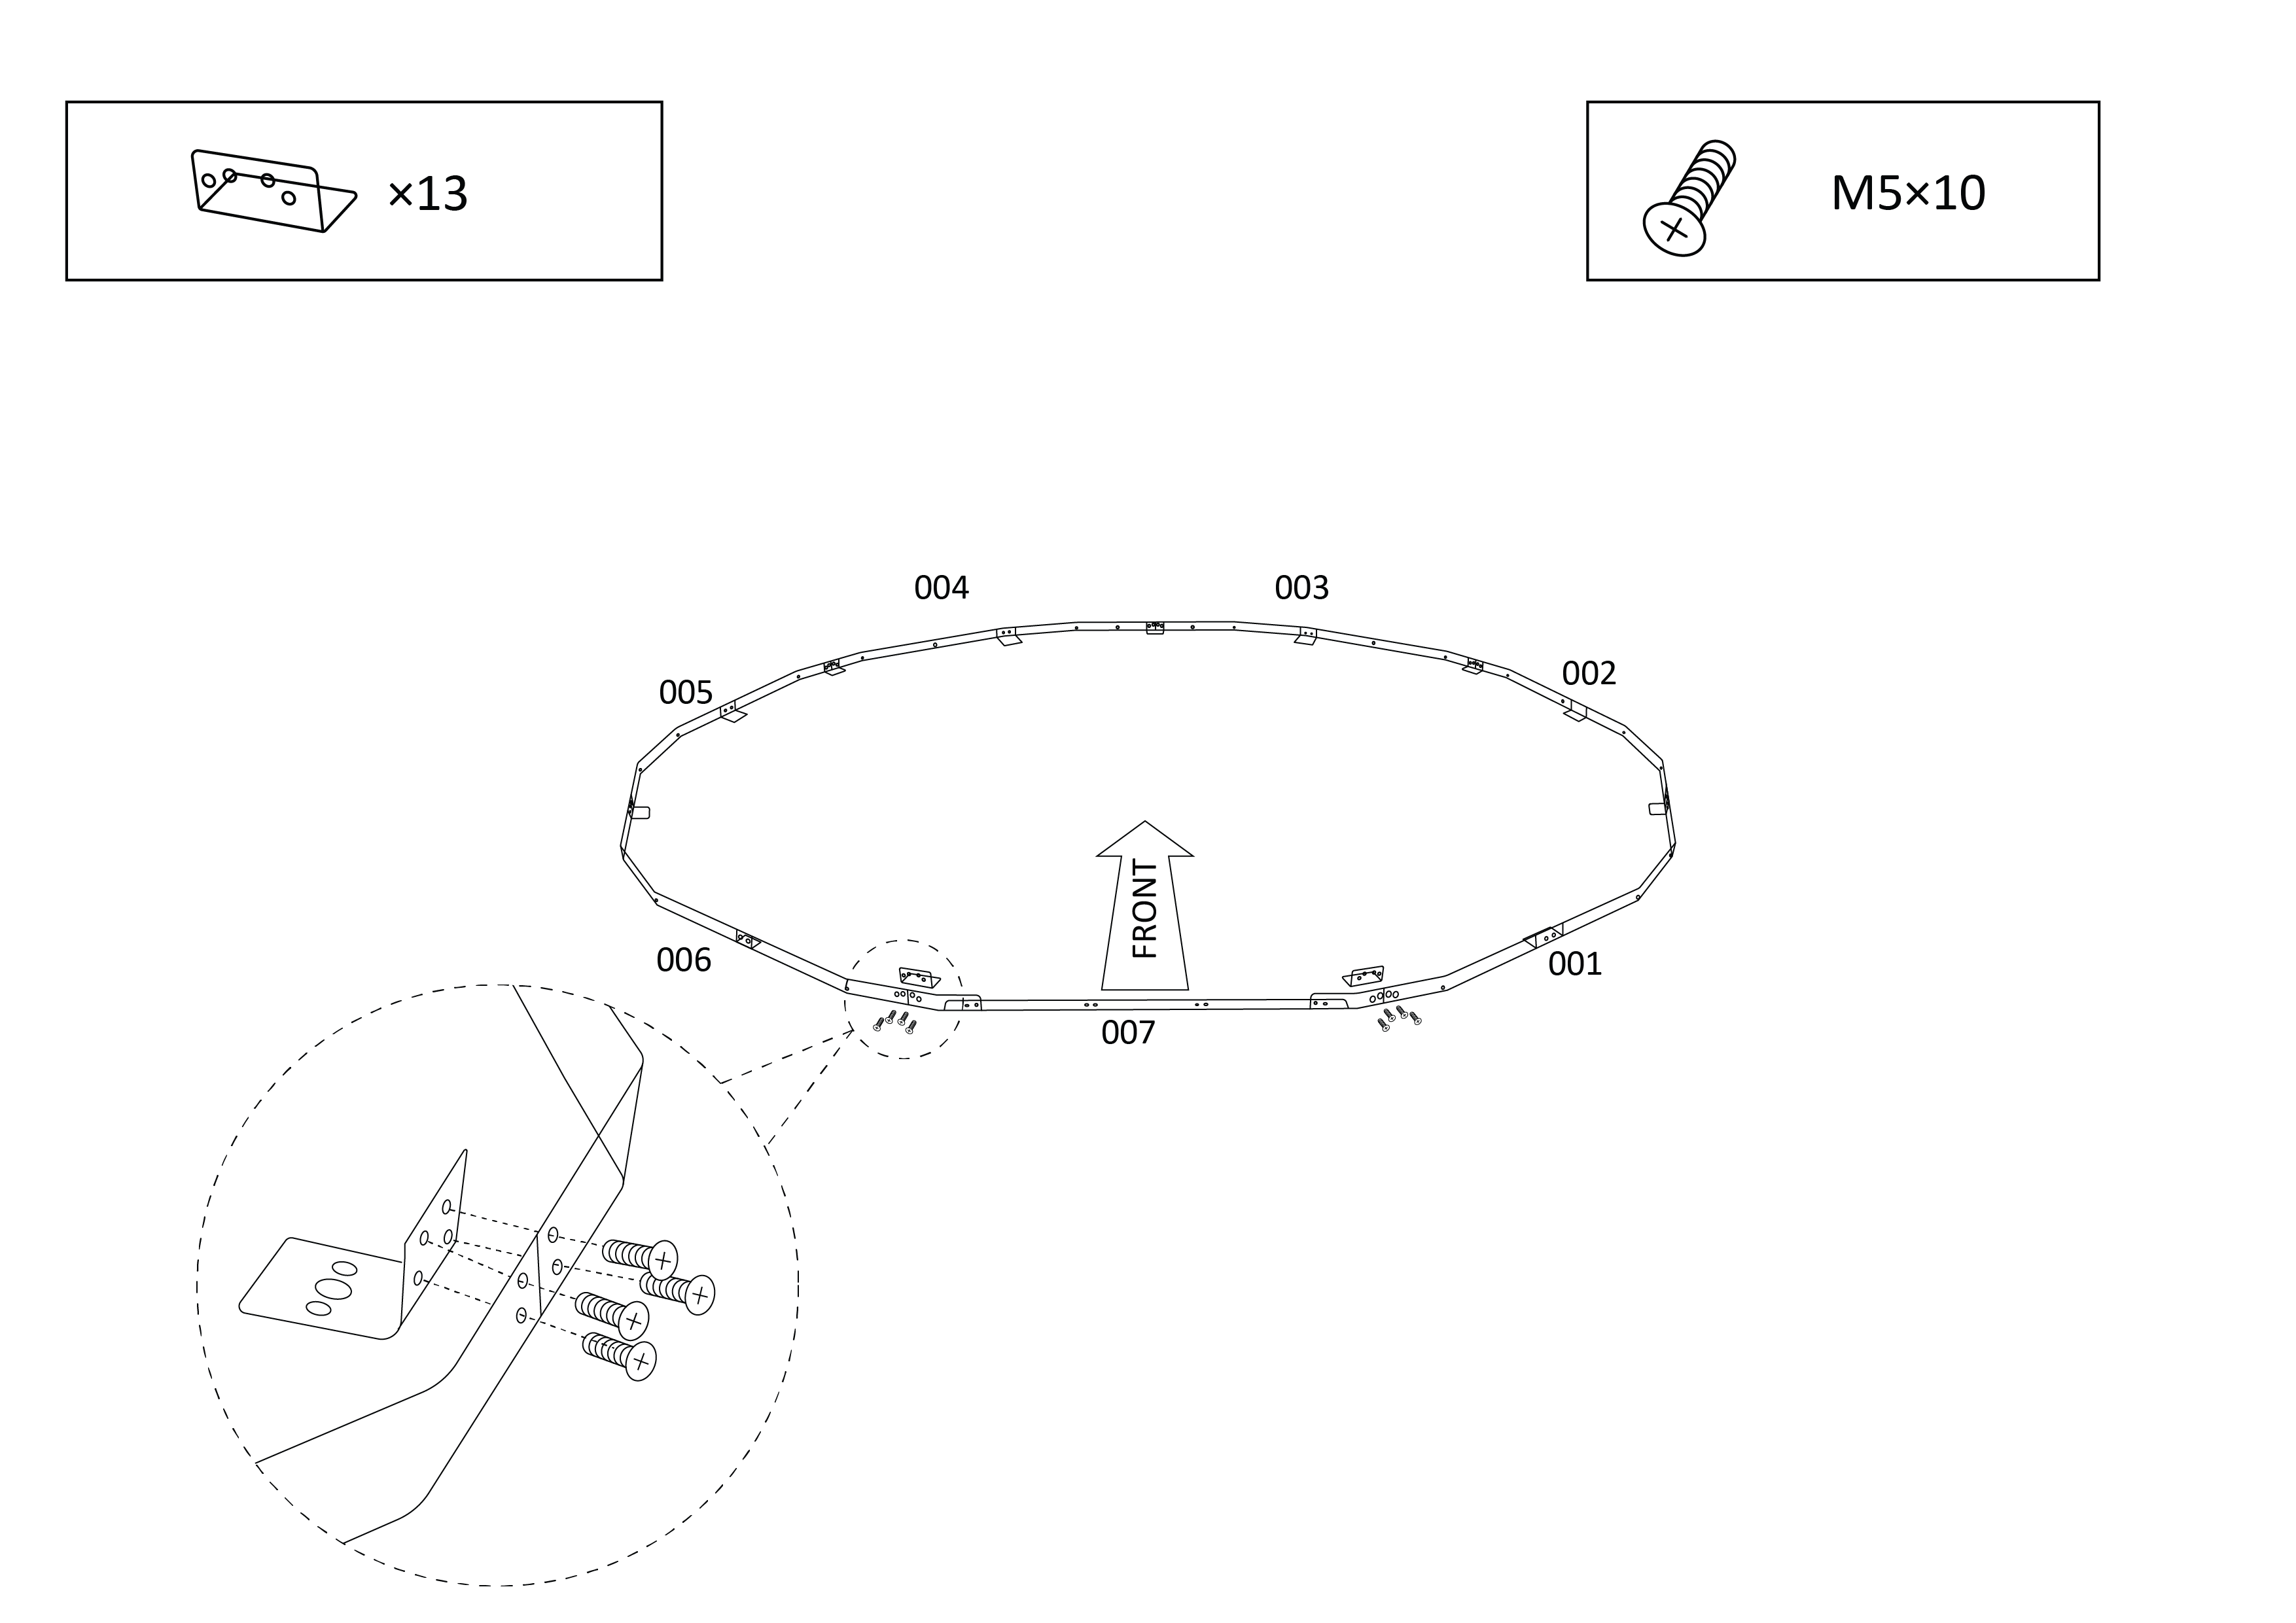
2. Secure these strips together using the L-shape brackets. The remaining brackets are placed in the middle of these strips. Make sure the brackets sit on the inside of the dome.

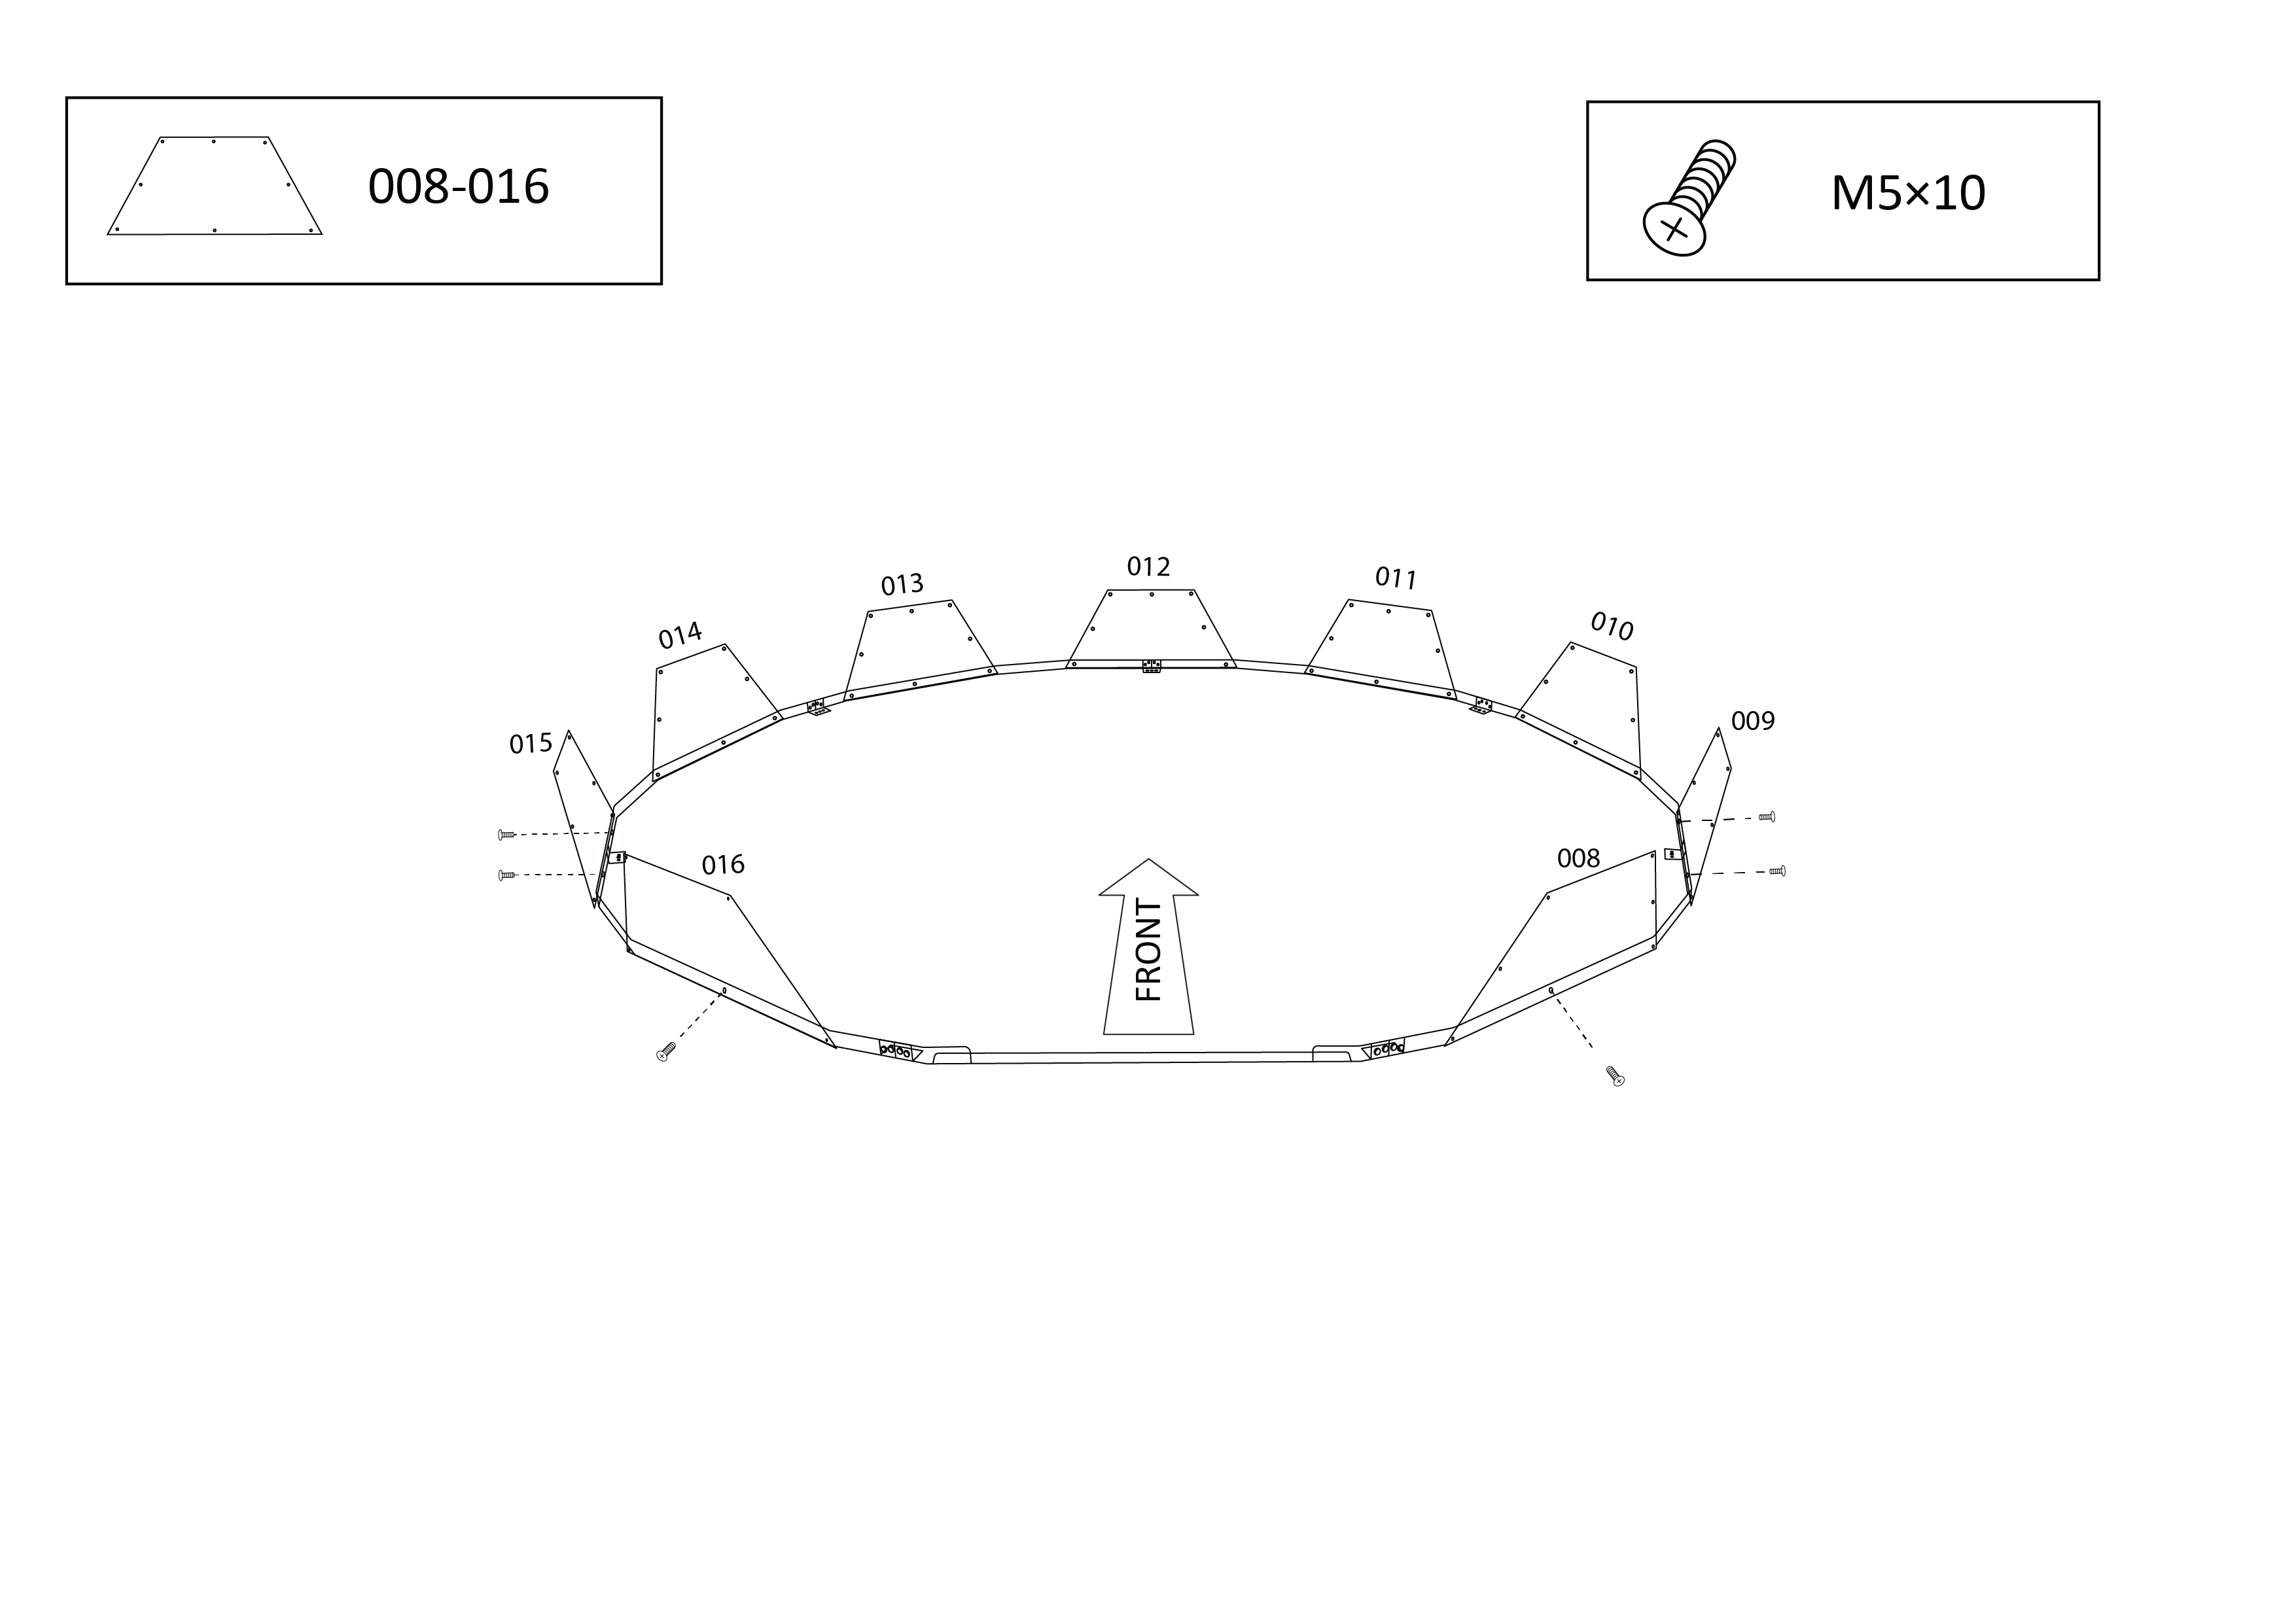
3. Taking panels 008-016, start attaching these in numerical order, starting from the right hand side of the dome and working anti-clockwise. Make sure to only put screws in the holes shown, alternating between one and two screws per panel, to avoid having to remove screws when adding panels in later steps.

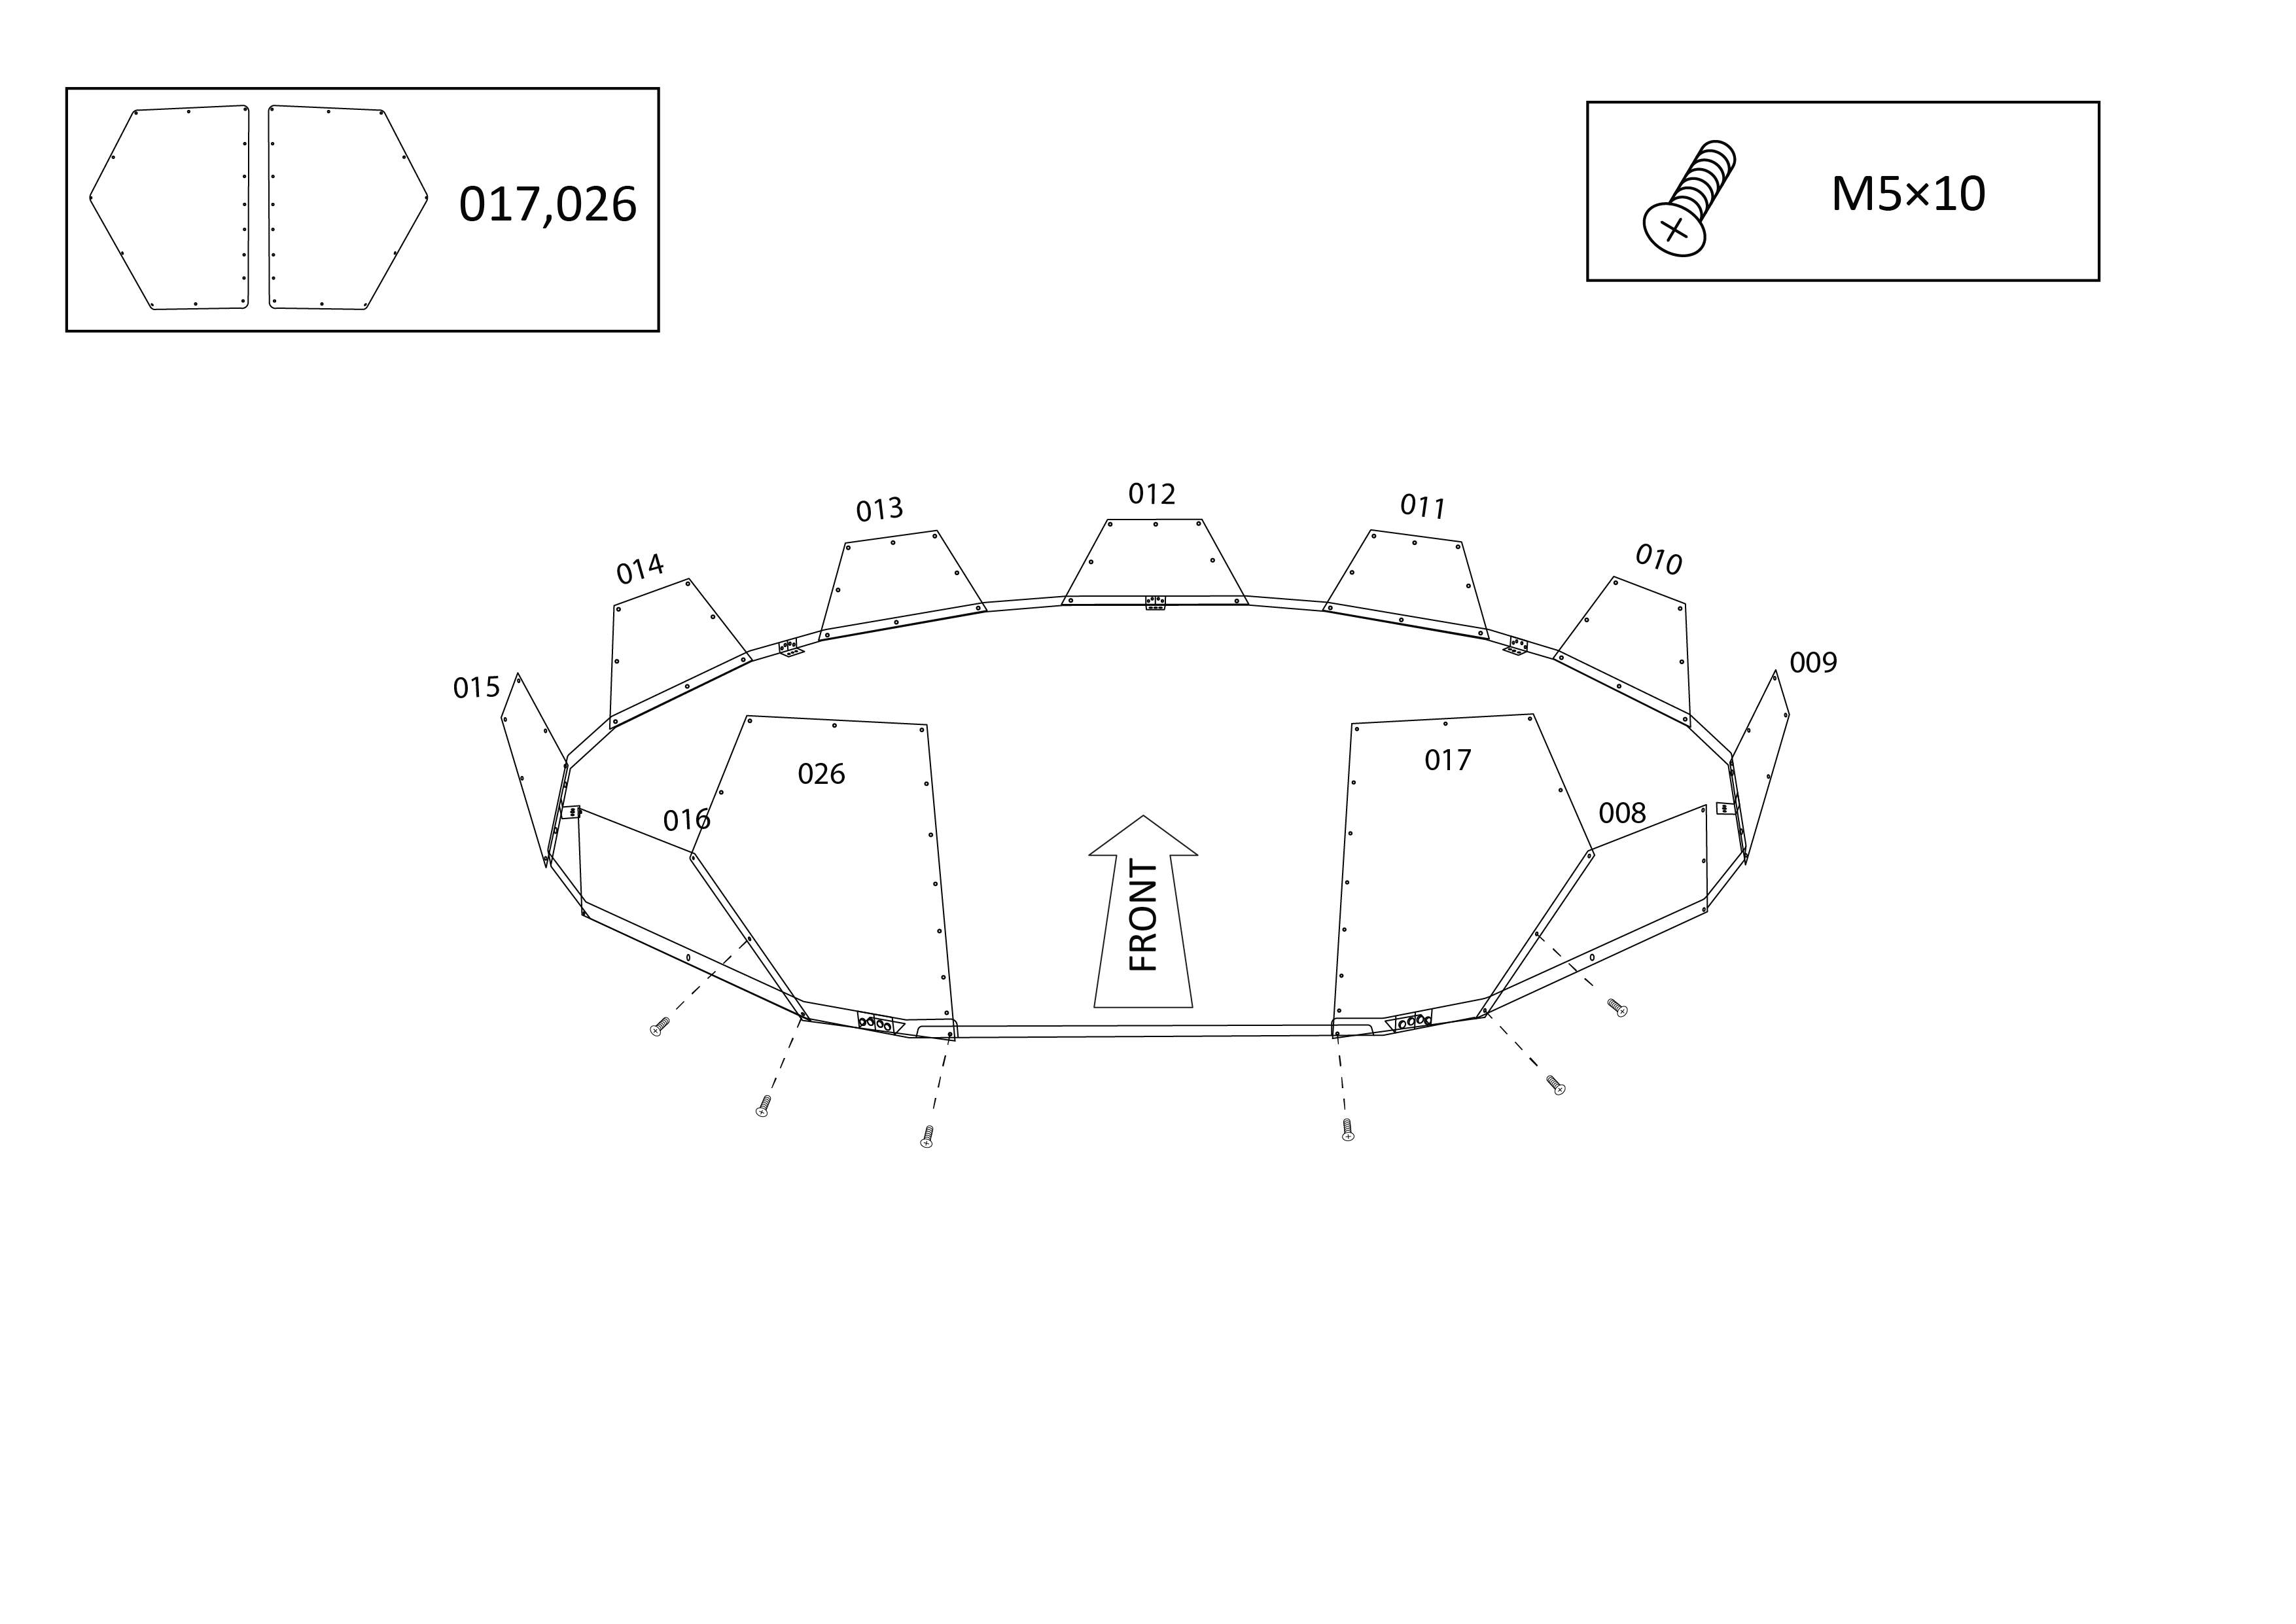
4. Attach panels 026 and 017 to either side of the door threshold (007), ensuring screws are only put in the holes shown.

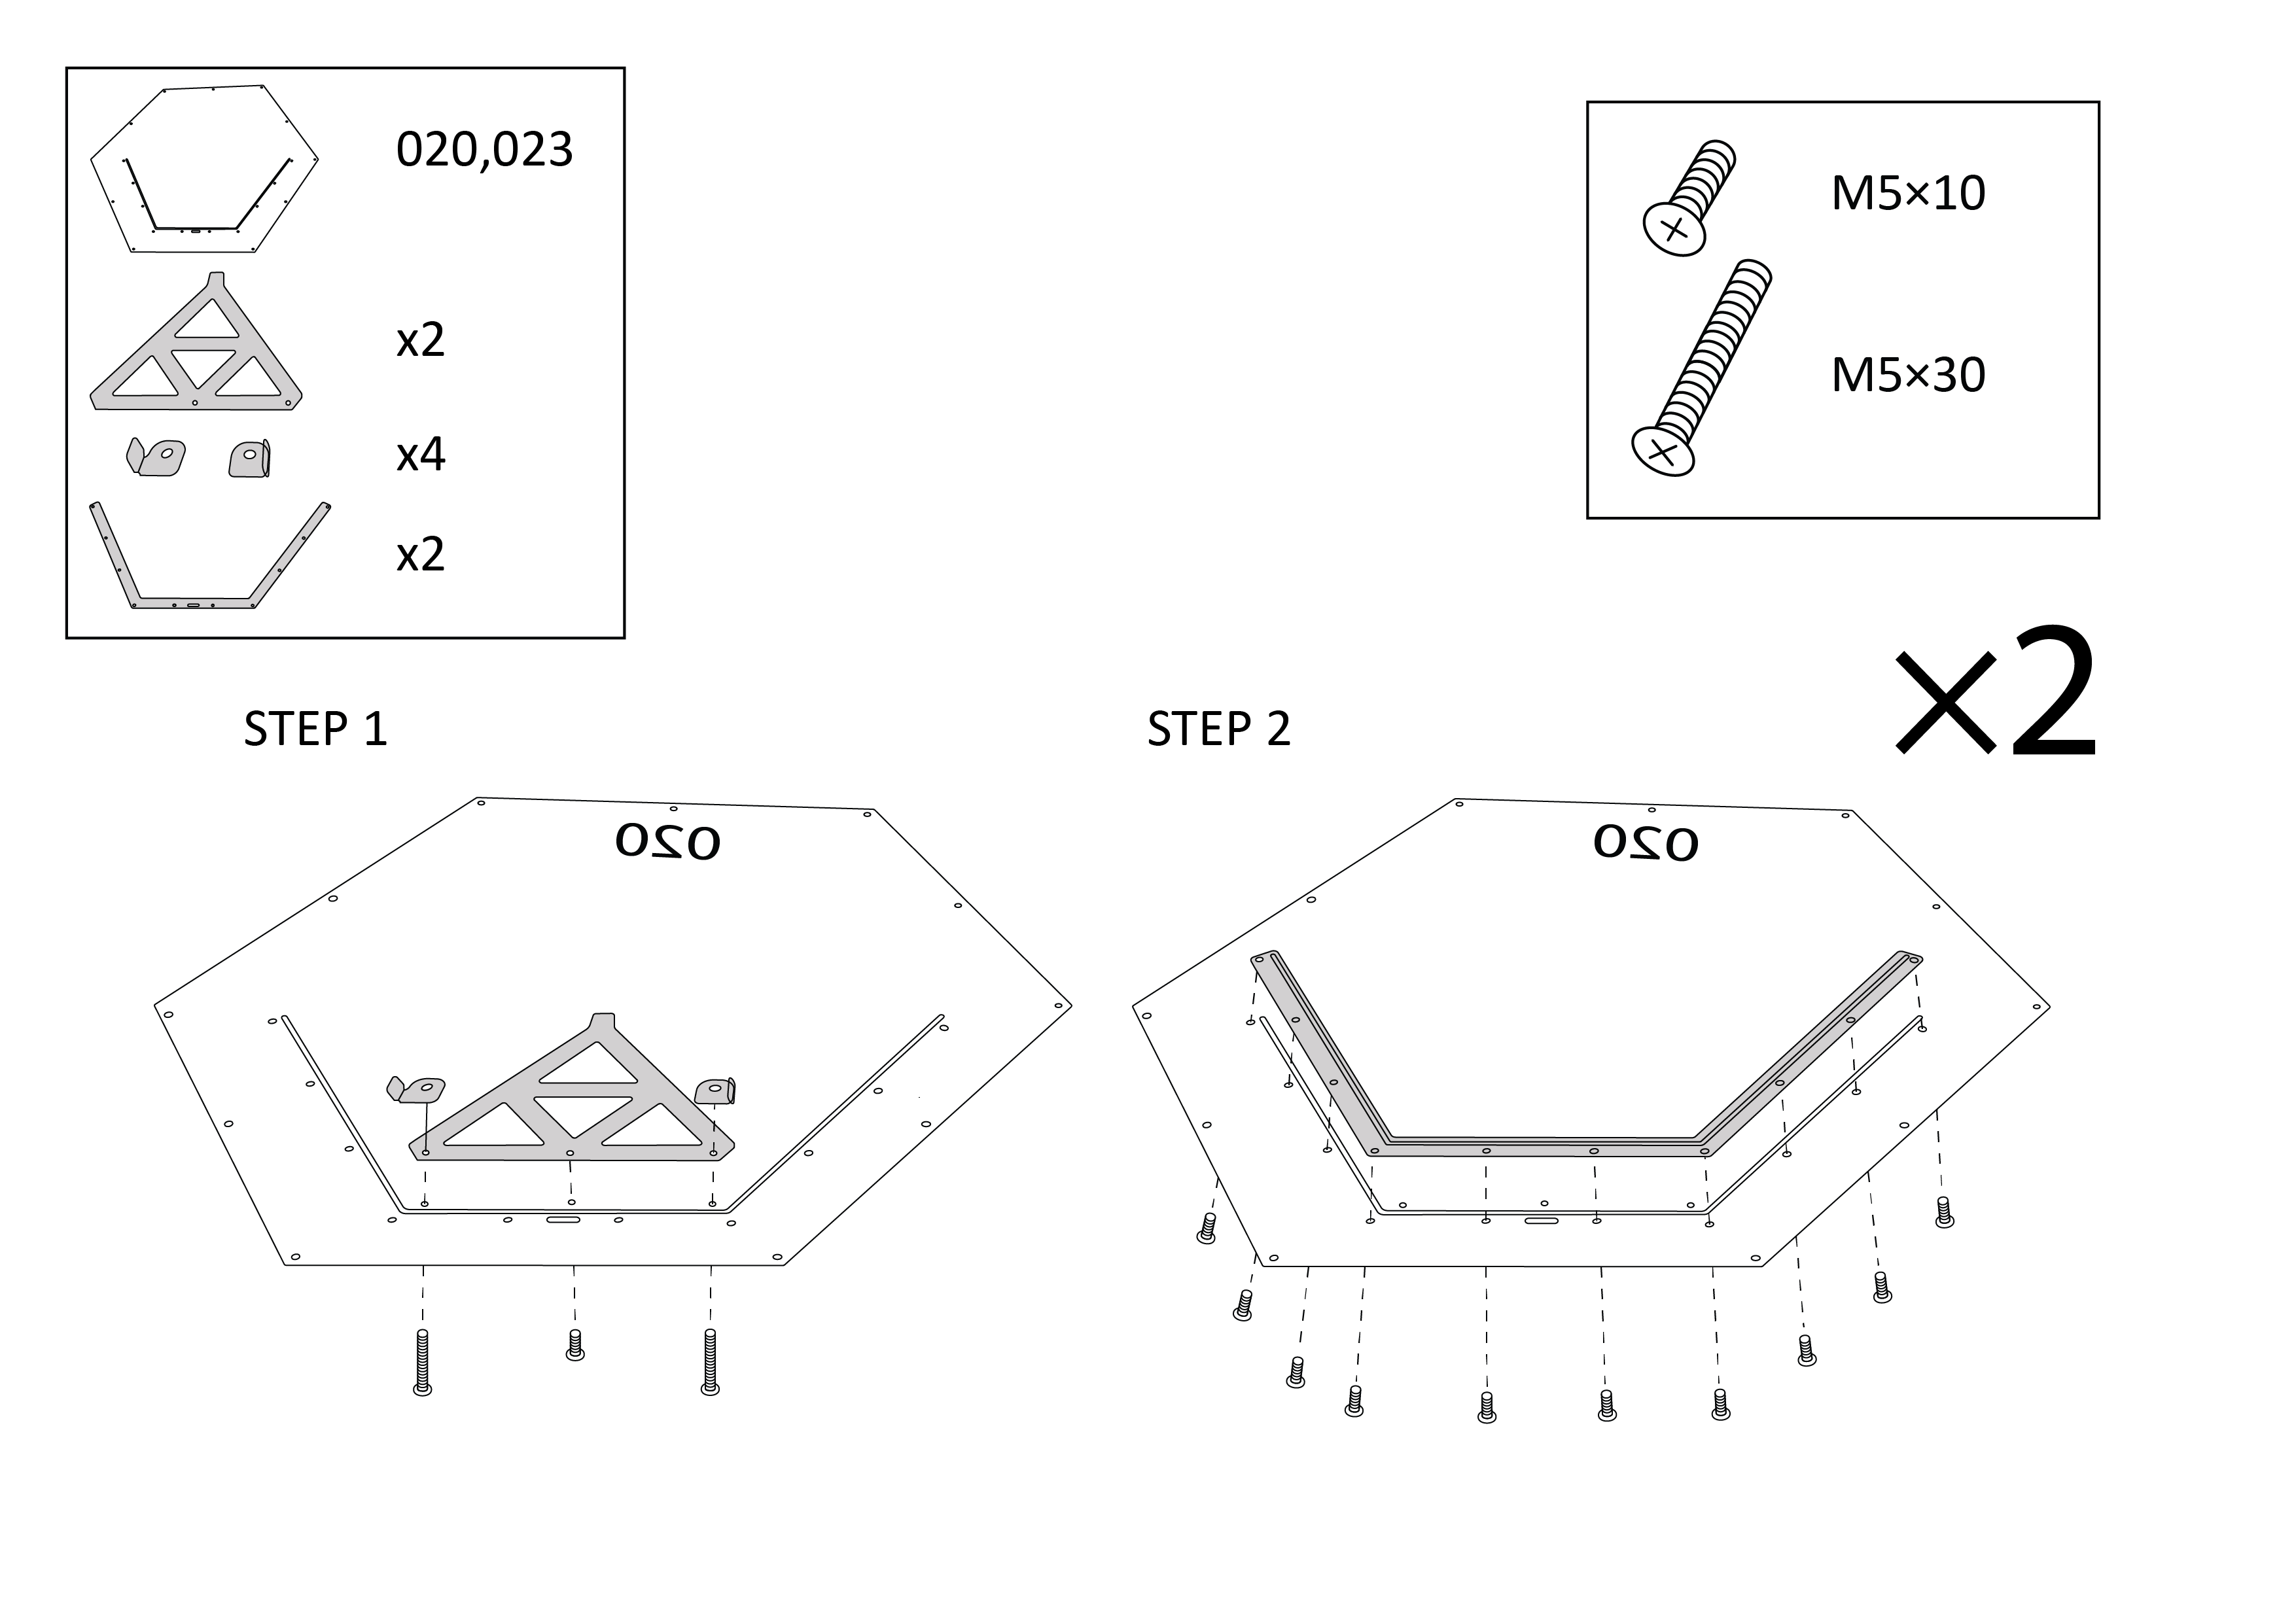
5. Prepare panels 020 and 023, which make up your retractable windows. To do this, stack the components on the inside of the panel so that the window pushes outwards. Make sure to use longer screws where highlighted so you can fit the locking clips on top.

Tip: Don't over-tighten the long screws too much as you want to ensure the clips can twist back and fouth.

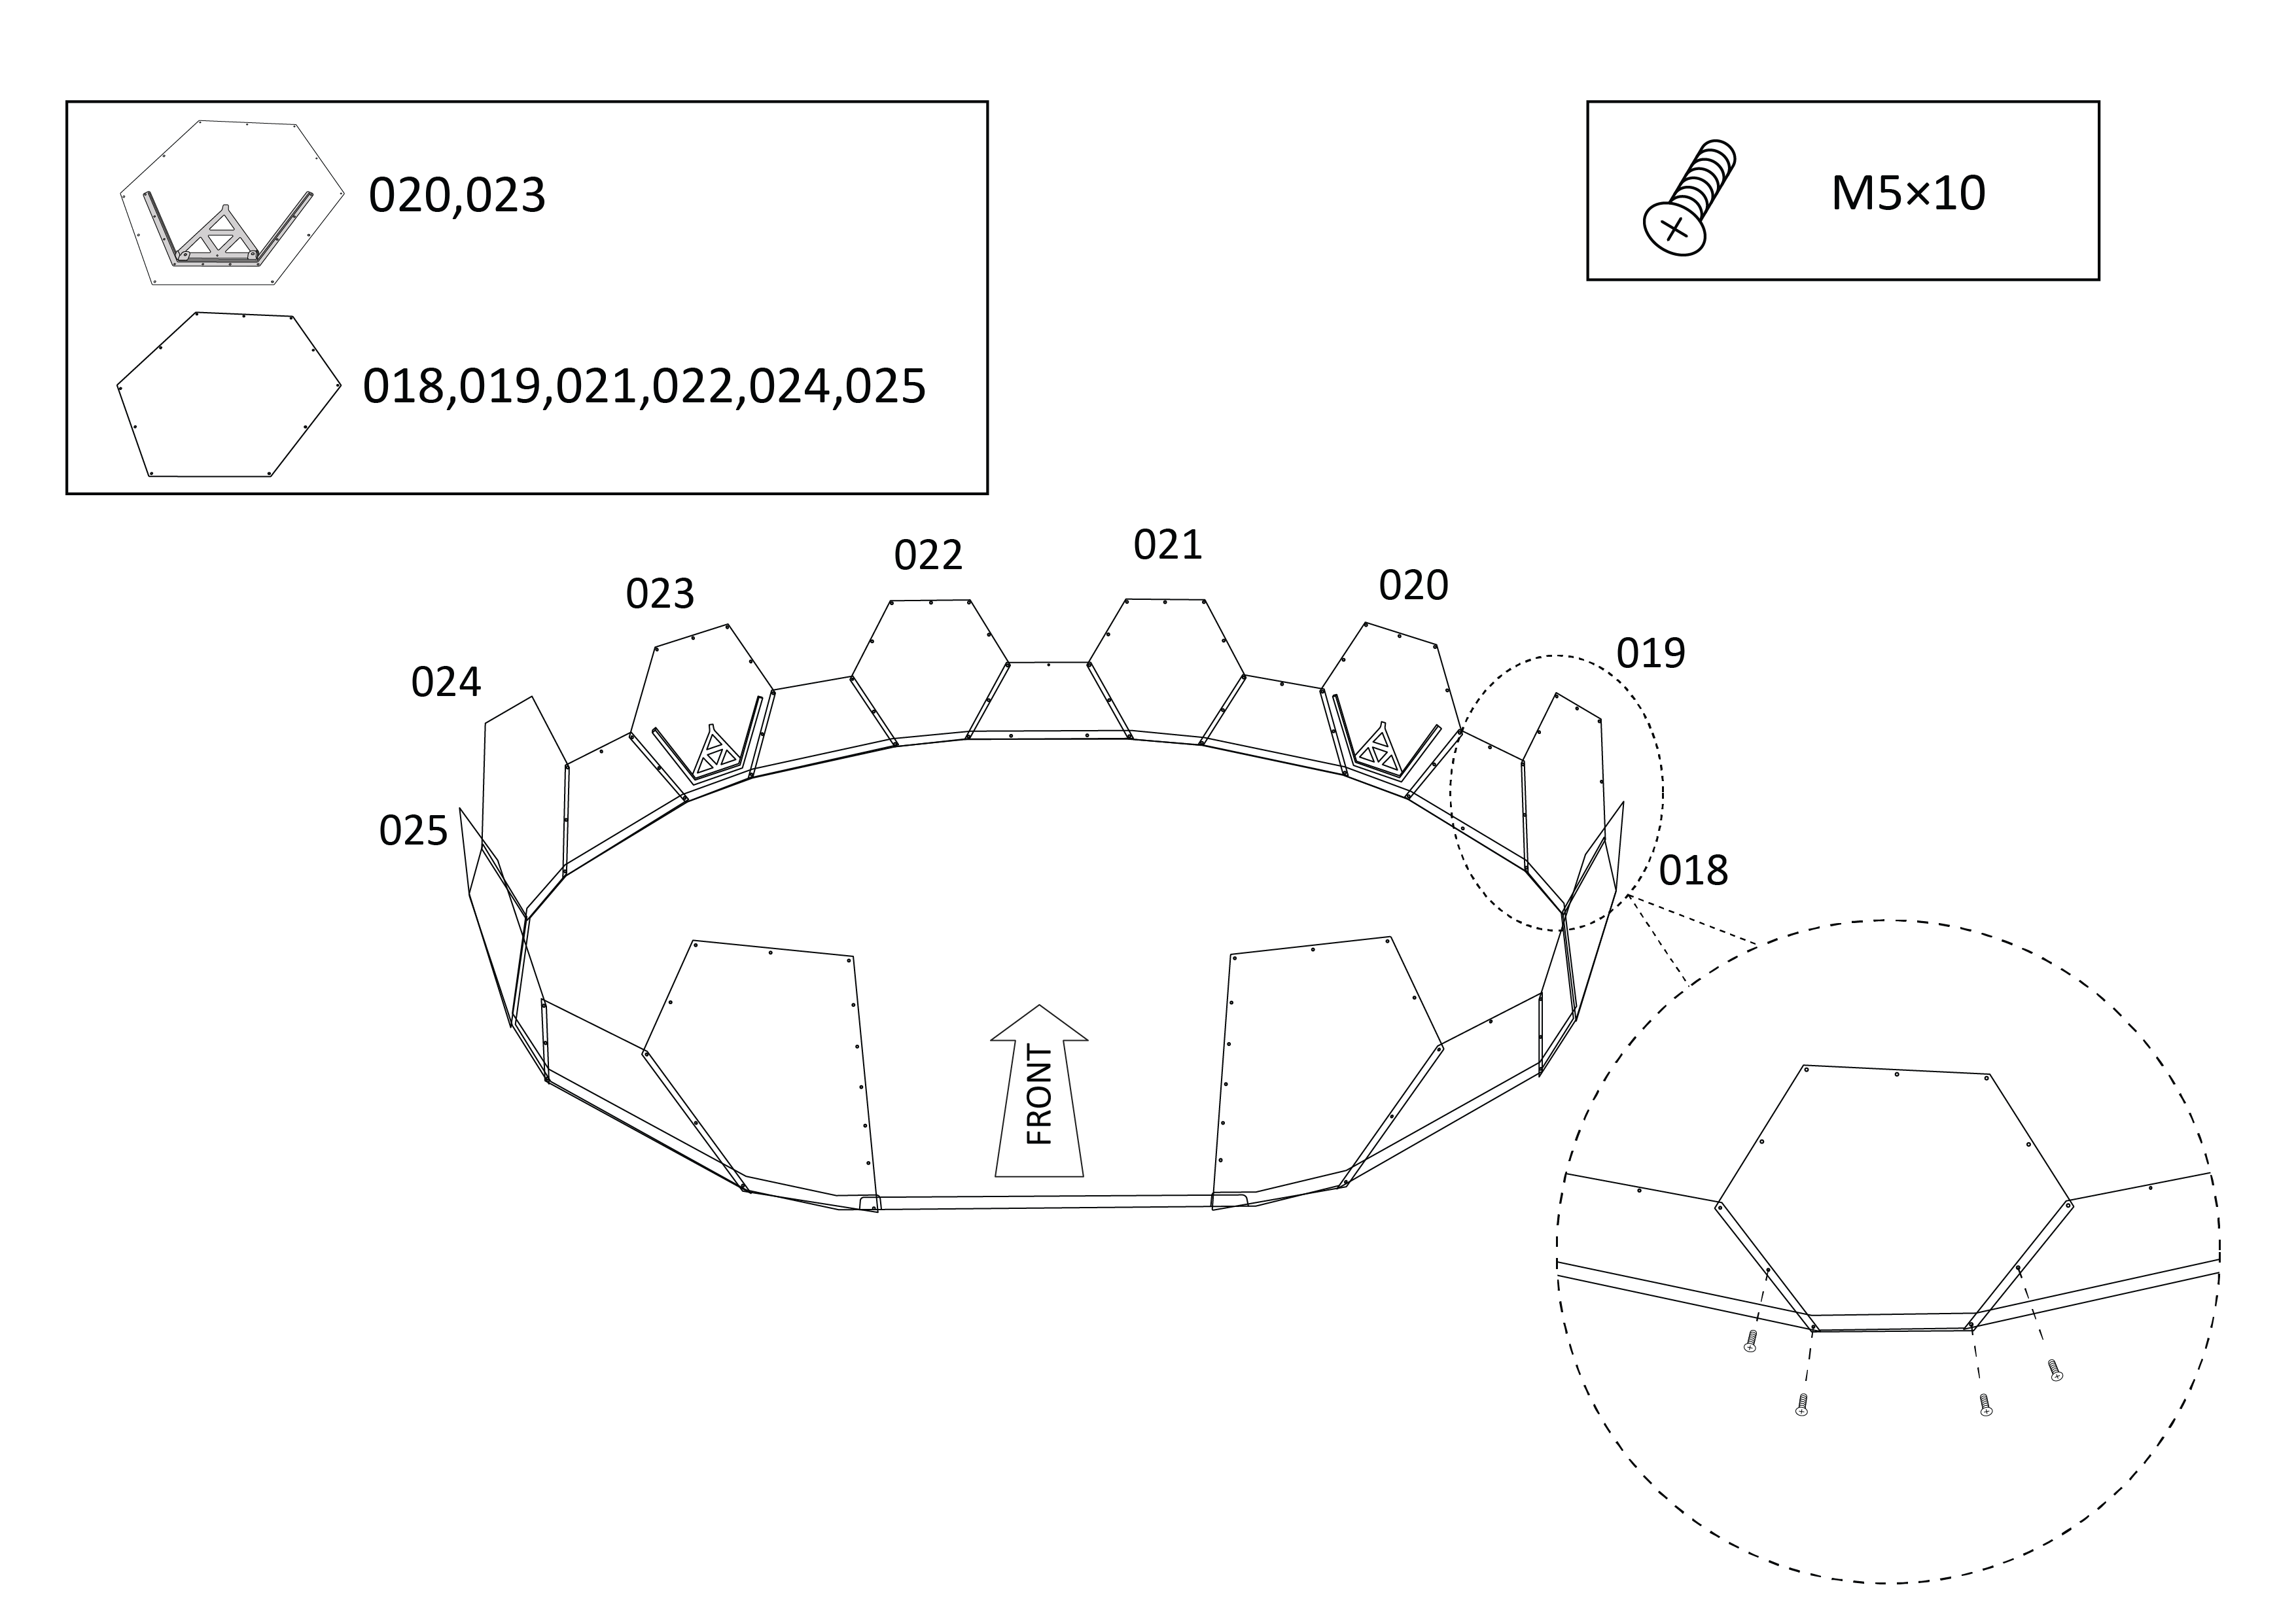
6. Attach panels 018-025, which includes the two window panels you’ve just constructed. These will slot directly into the gaps left by the last row.

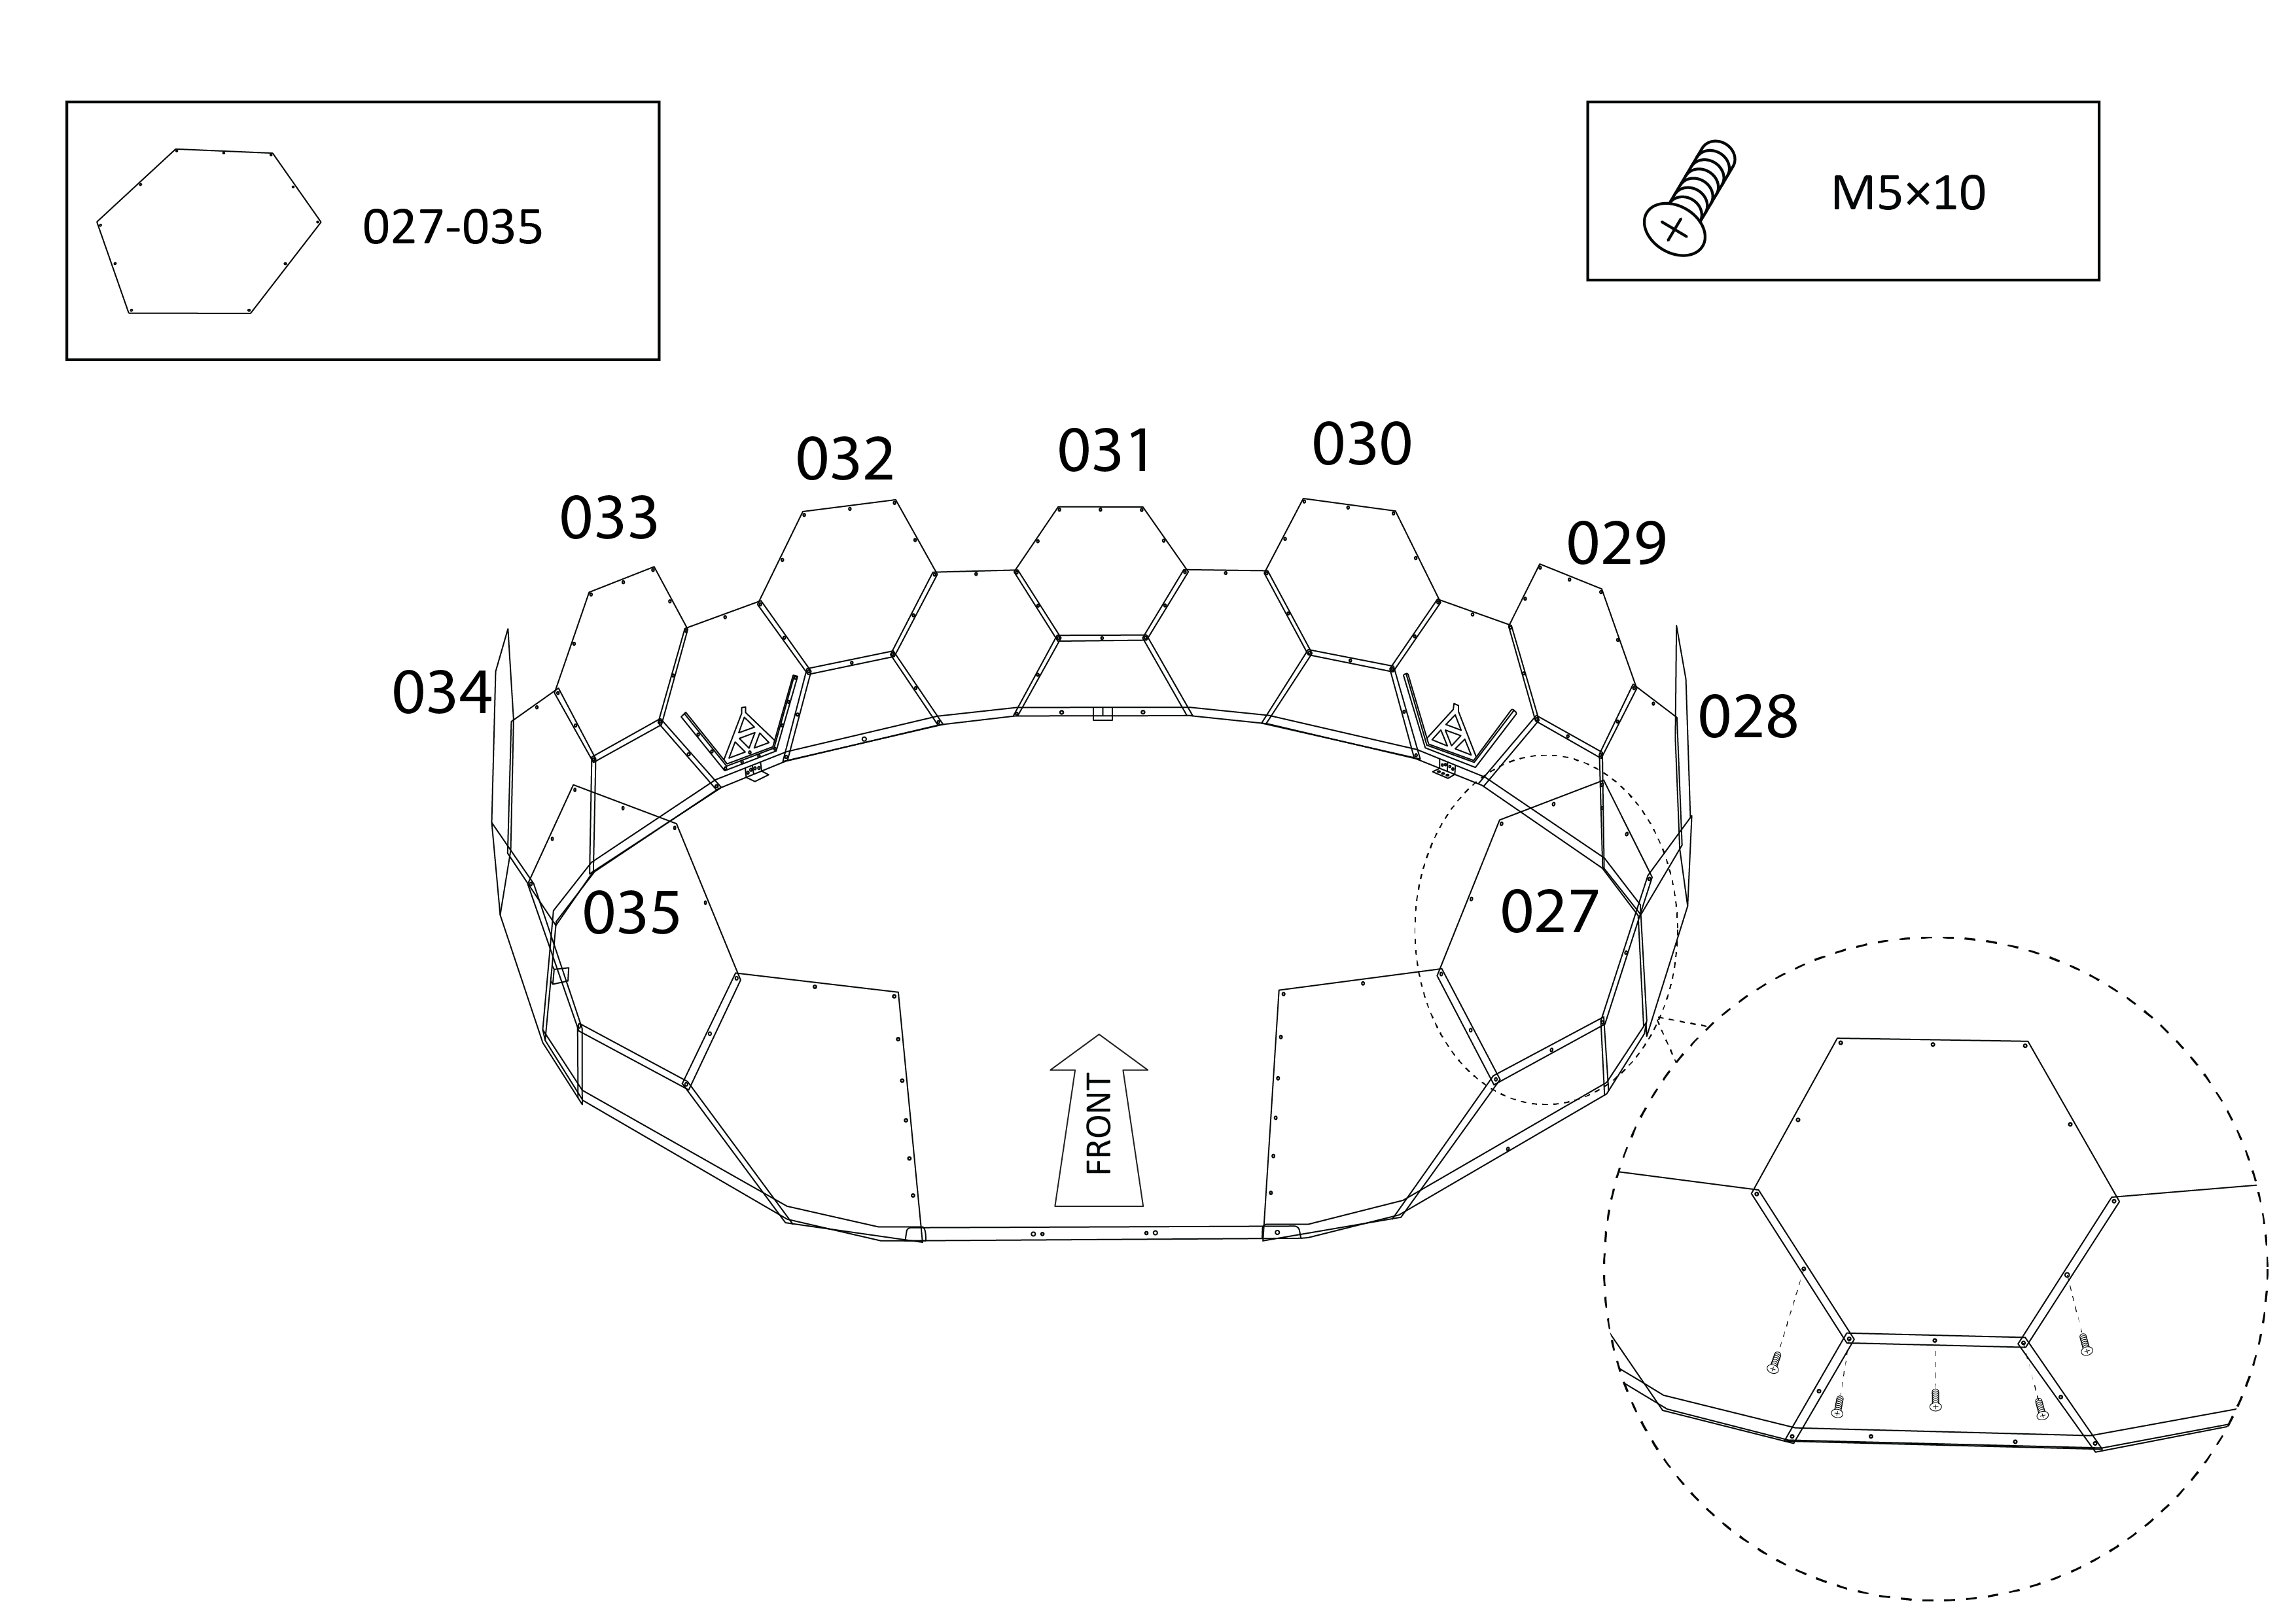
7. Attach panels 027-035, continuing in the anti-clockwise pattern as before.

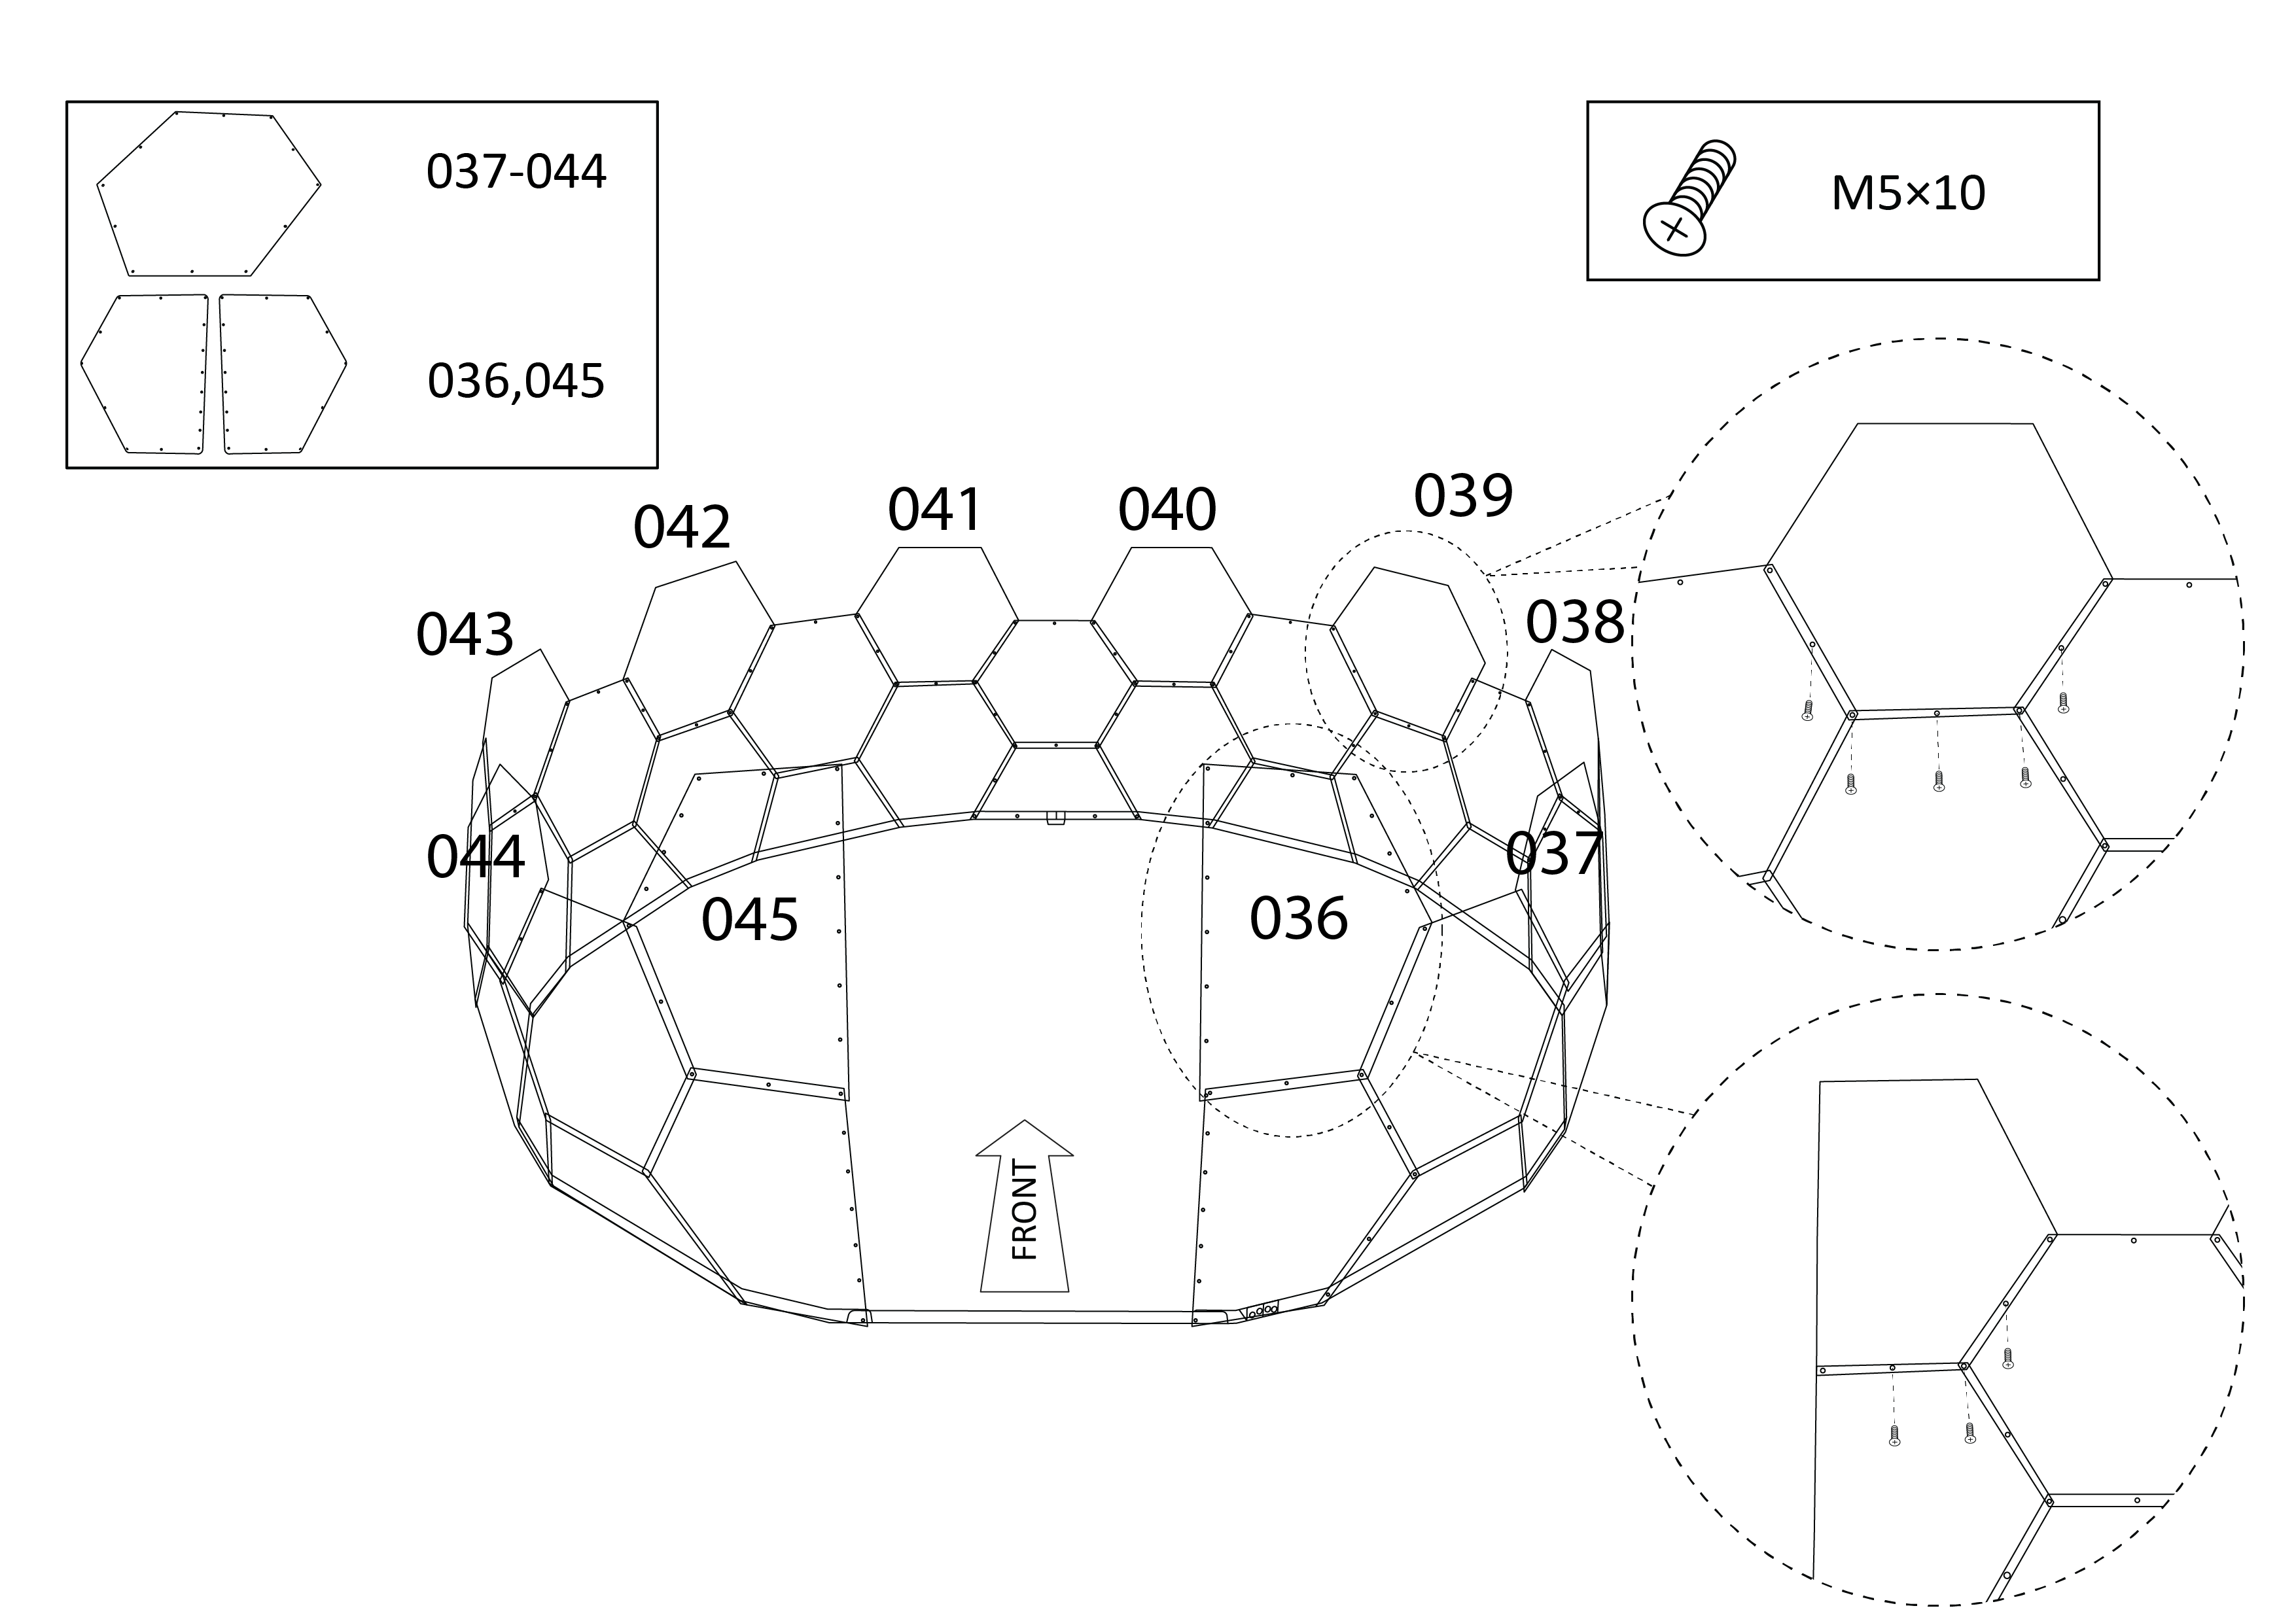
8. Attach panels 036-045.

NB: You may find the walls on either side of the door start to bend inwards. The polycarbonate can bend, but you may find it easier to prop these up to keep them out of the way.

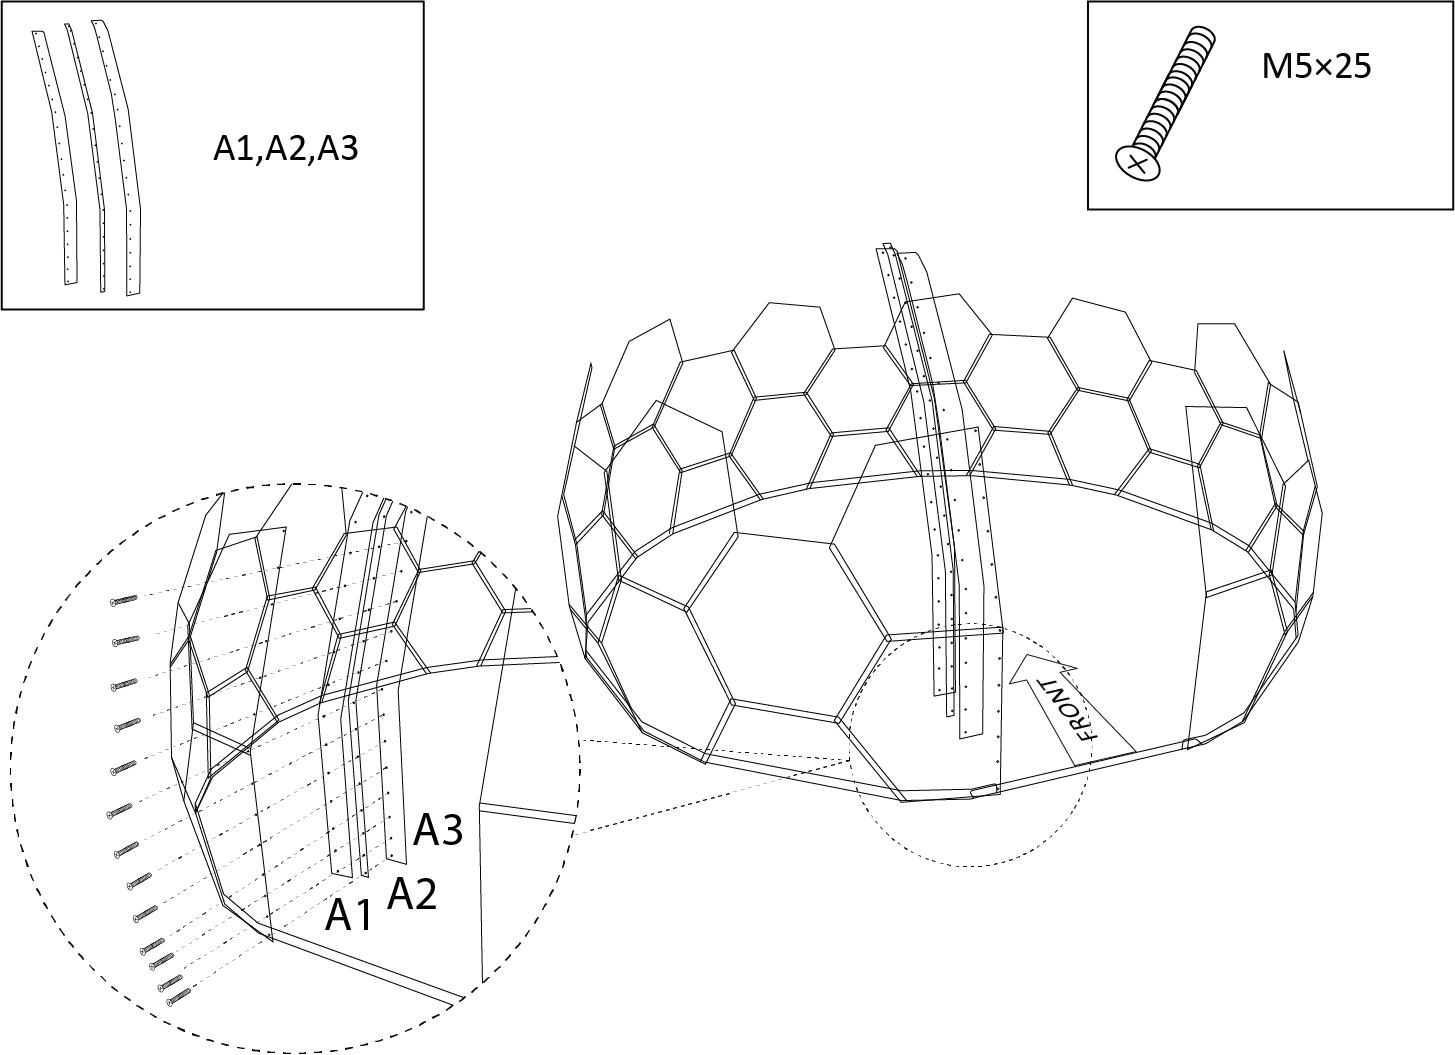
9. Select strips A1-A3 and place them one behind the other with the numbers facing out. With A1 at the front, attach them to the inside of the left hand-side of the doorway. To make the holes line up, A1 starts from the second hole up from the ground, so it sits on top of the upright portion of 007. A2 is slightly longer and so will poke out above the rest.

Tip: Make sure to use long screws here. It may help to attach the top and bottom screw holes first to stabilise the strips before securing the rest.

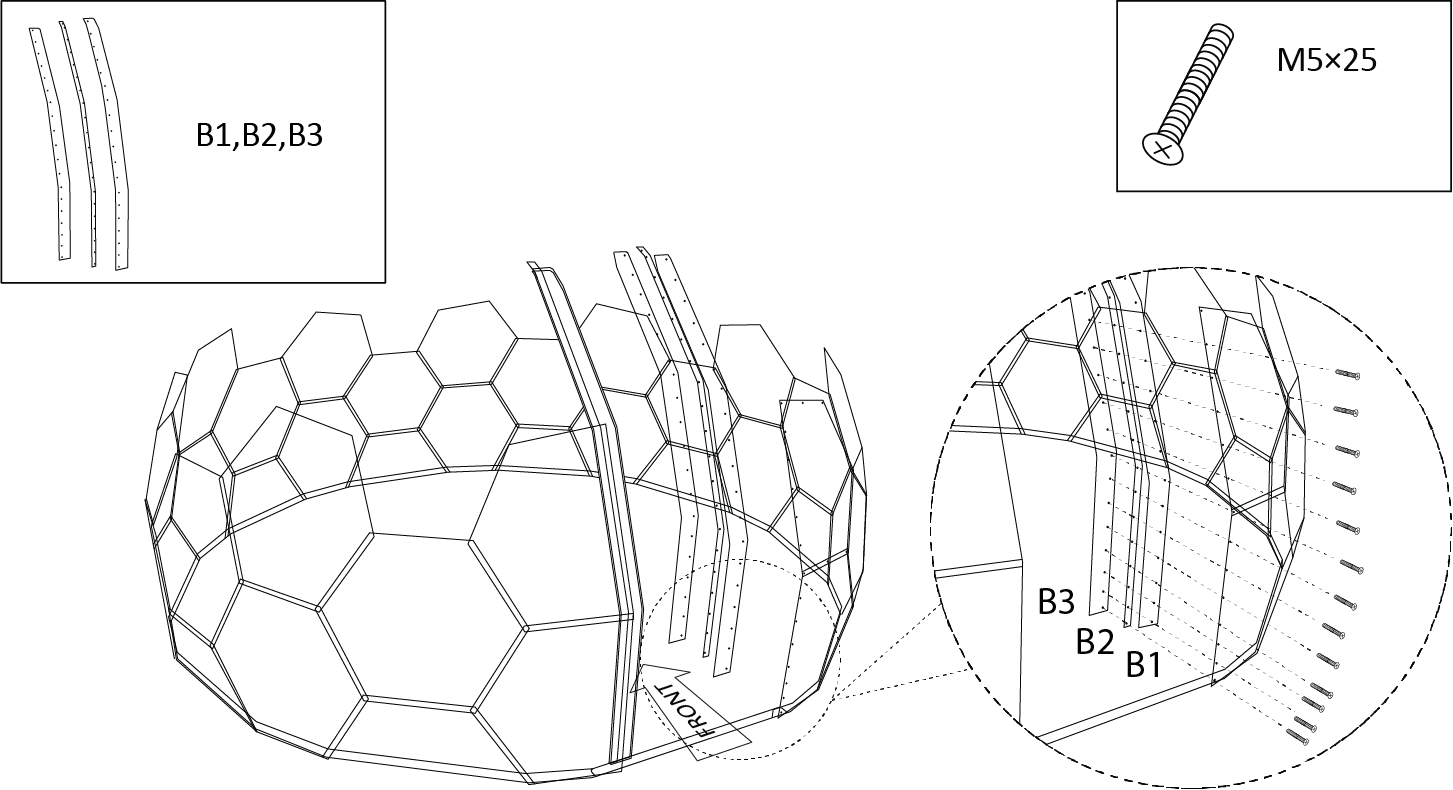
10. Repeat this process on the right hand-side of the door with panels B1-B3.

11. Attach panels 046-054, making sure to attach them in the correct places.

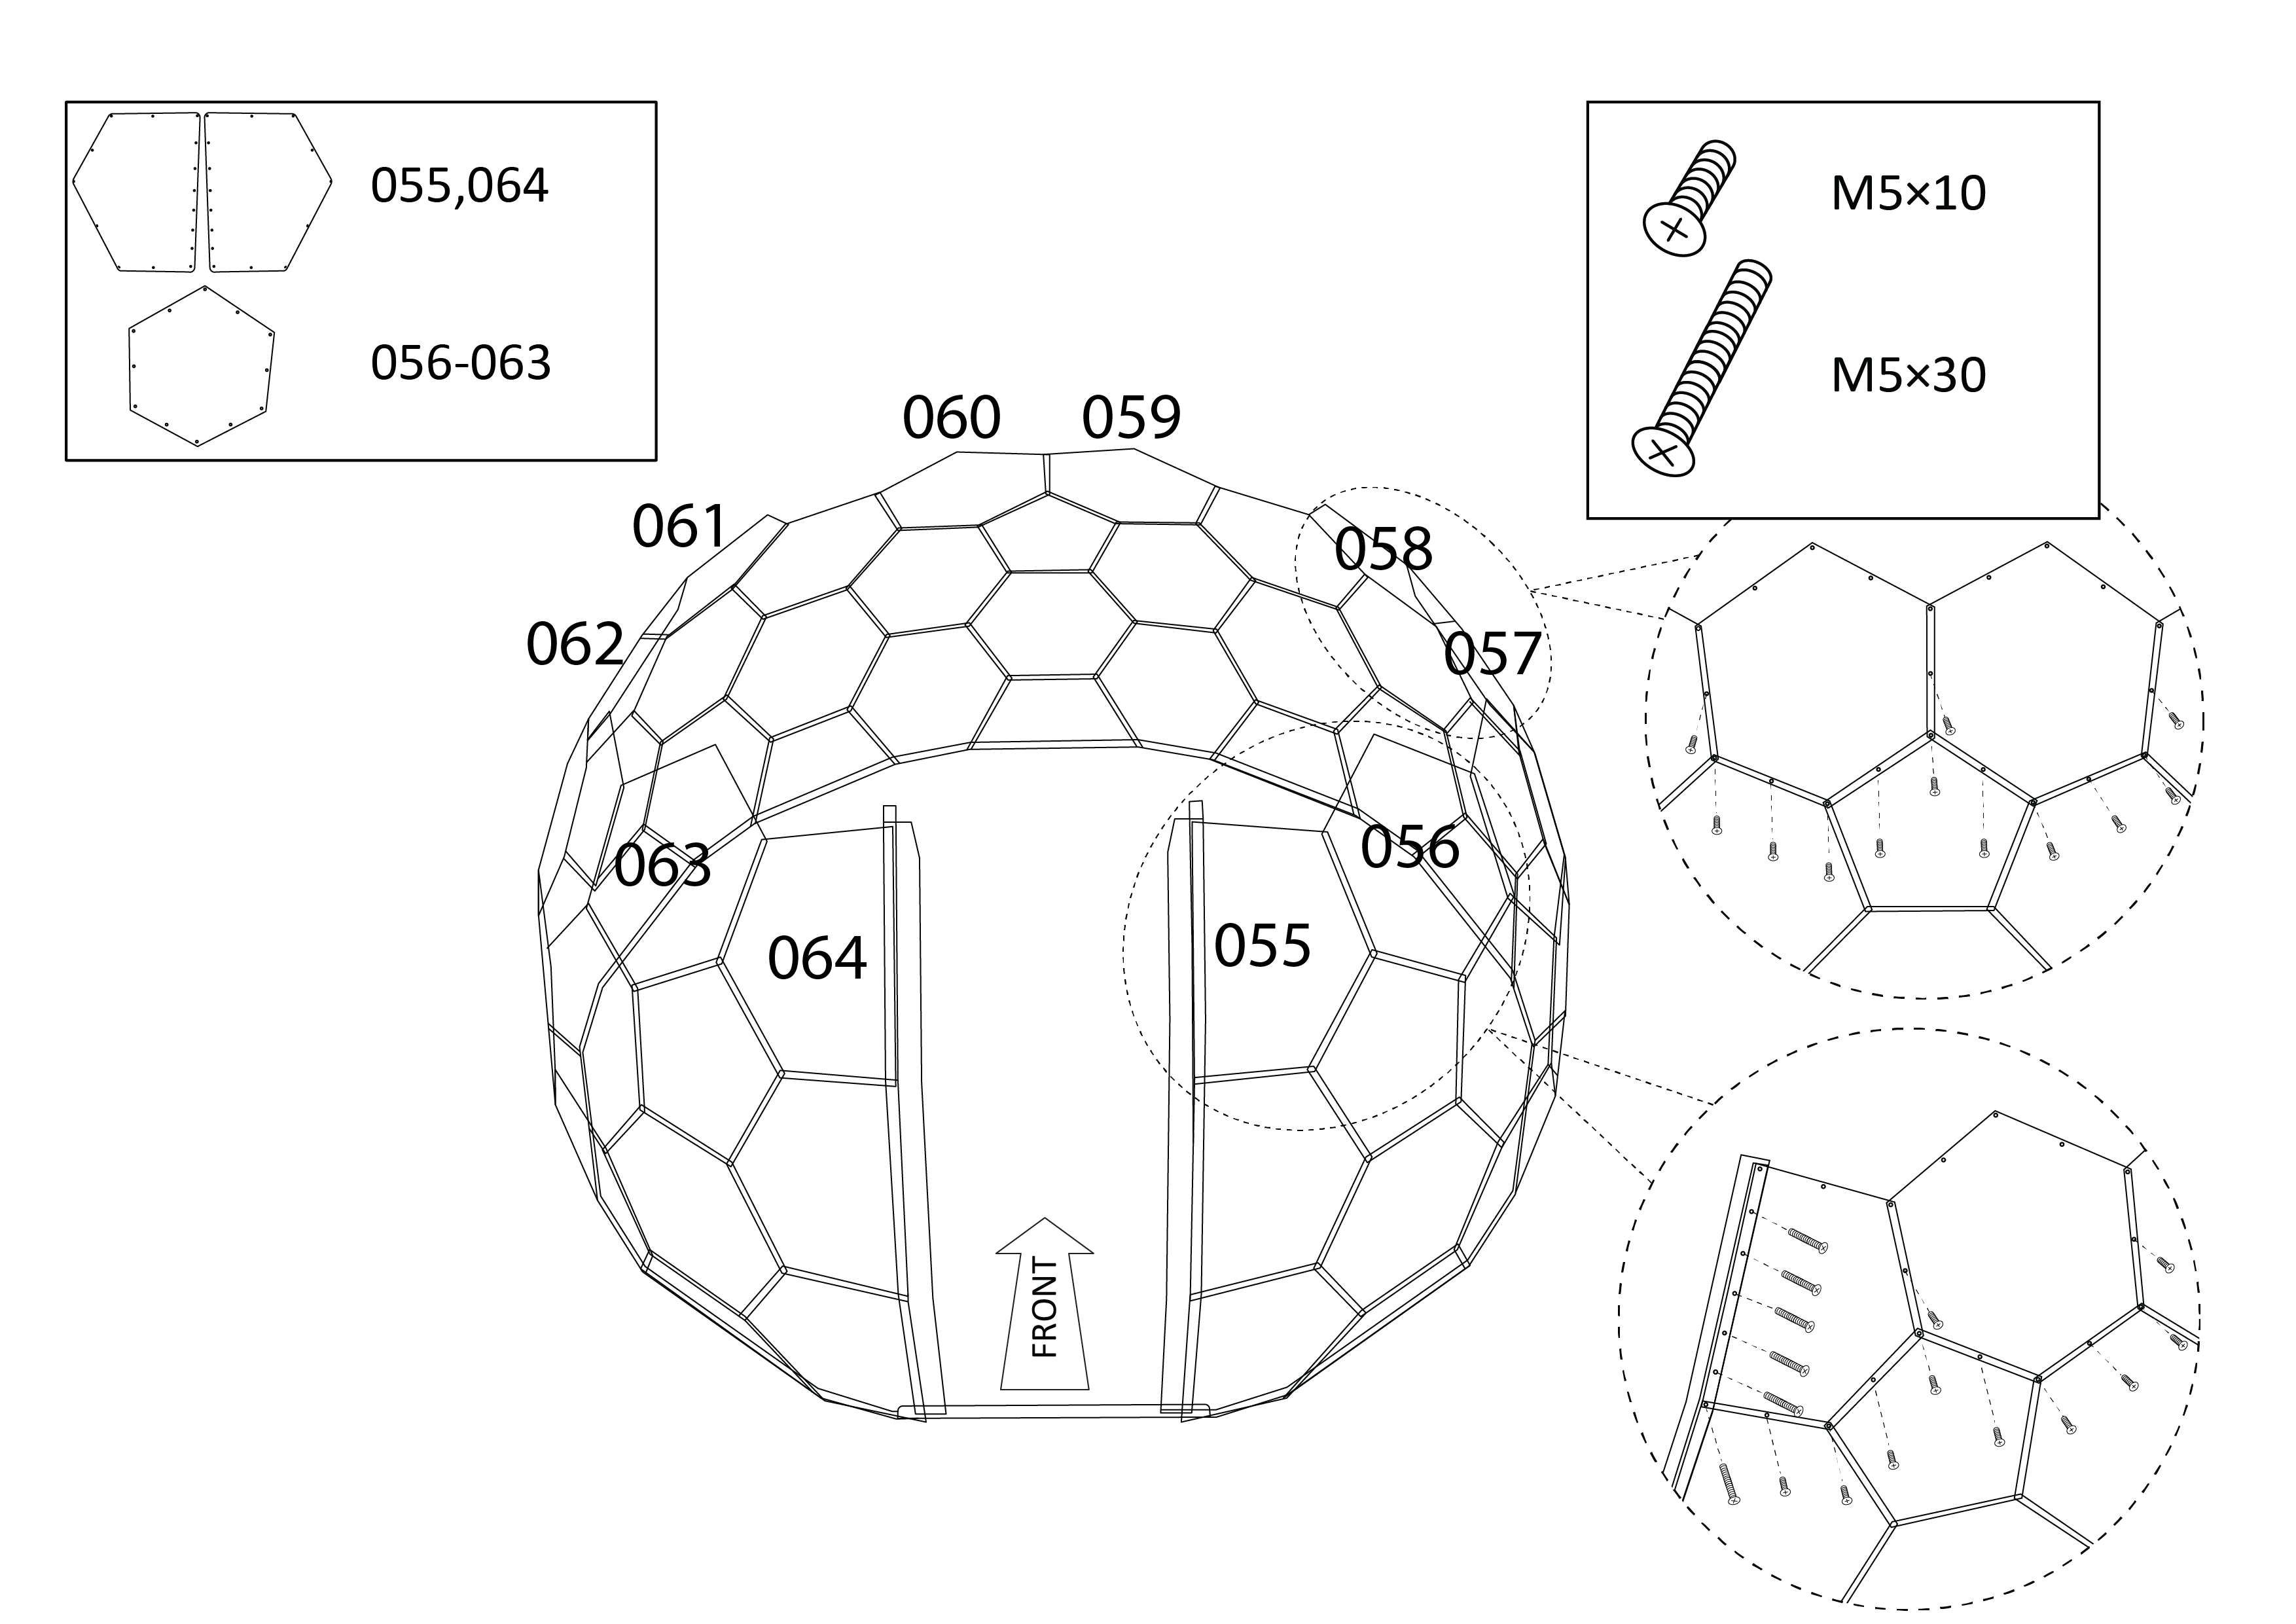
12. Panels 055-064 are grouped in pairs, so make sure you’re screwing these into the correct positions. Make sure to use the long screws for any holes that secure a panel to the door profile.

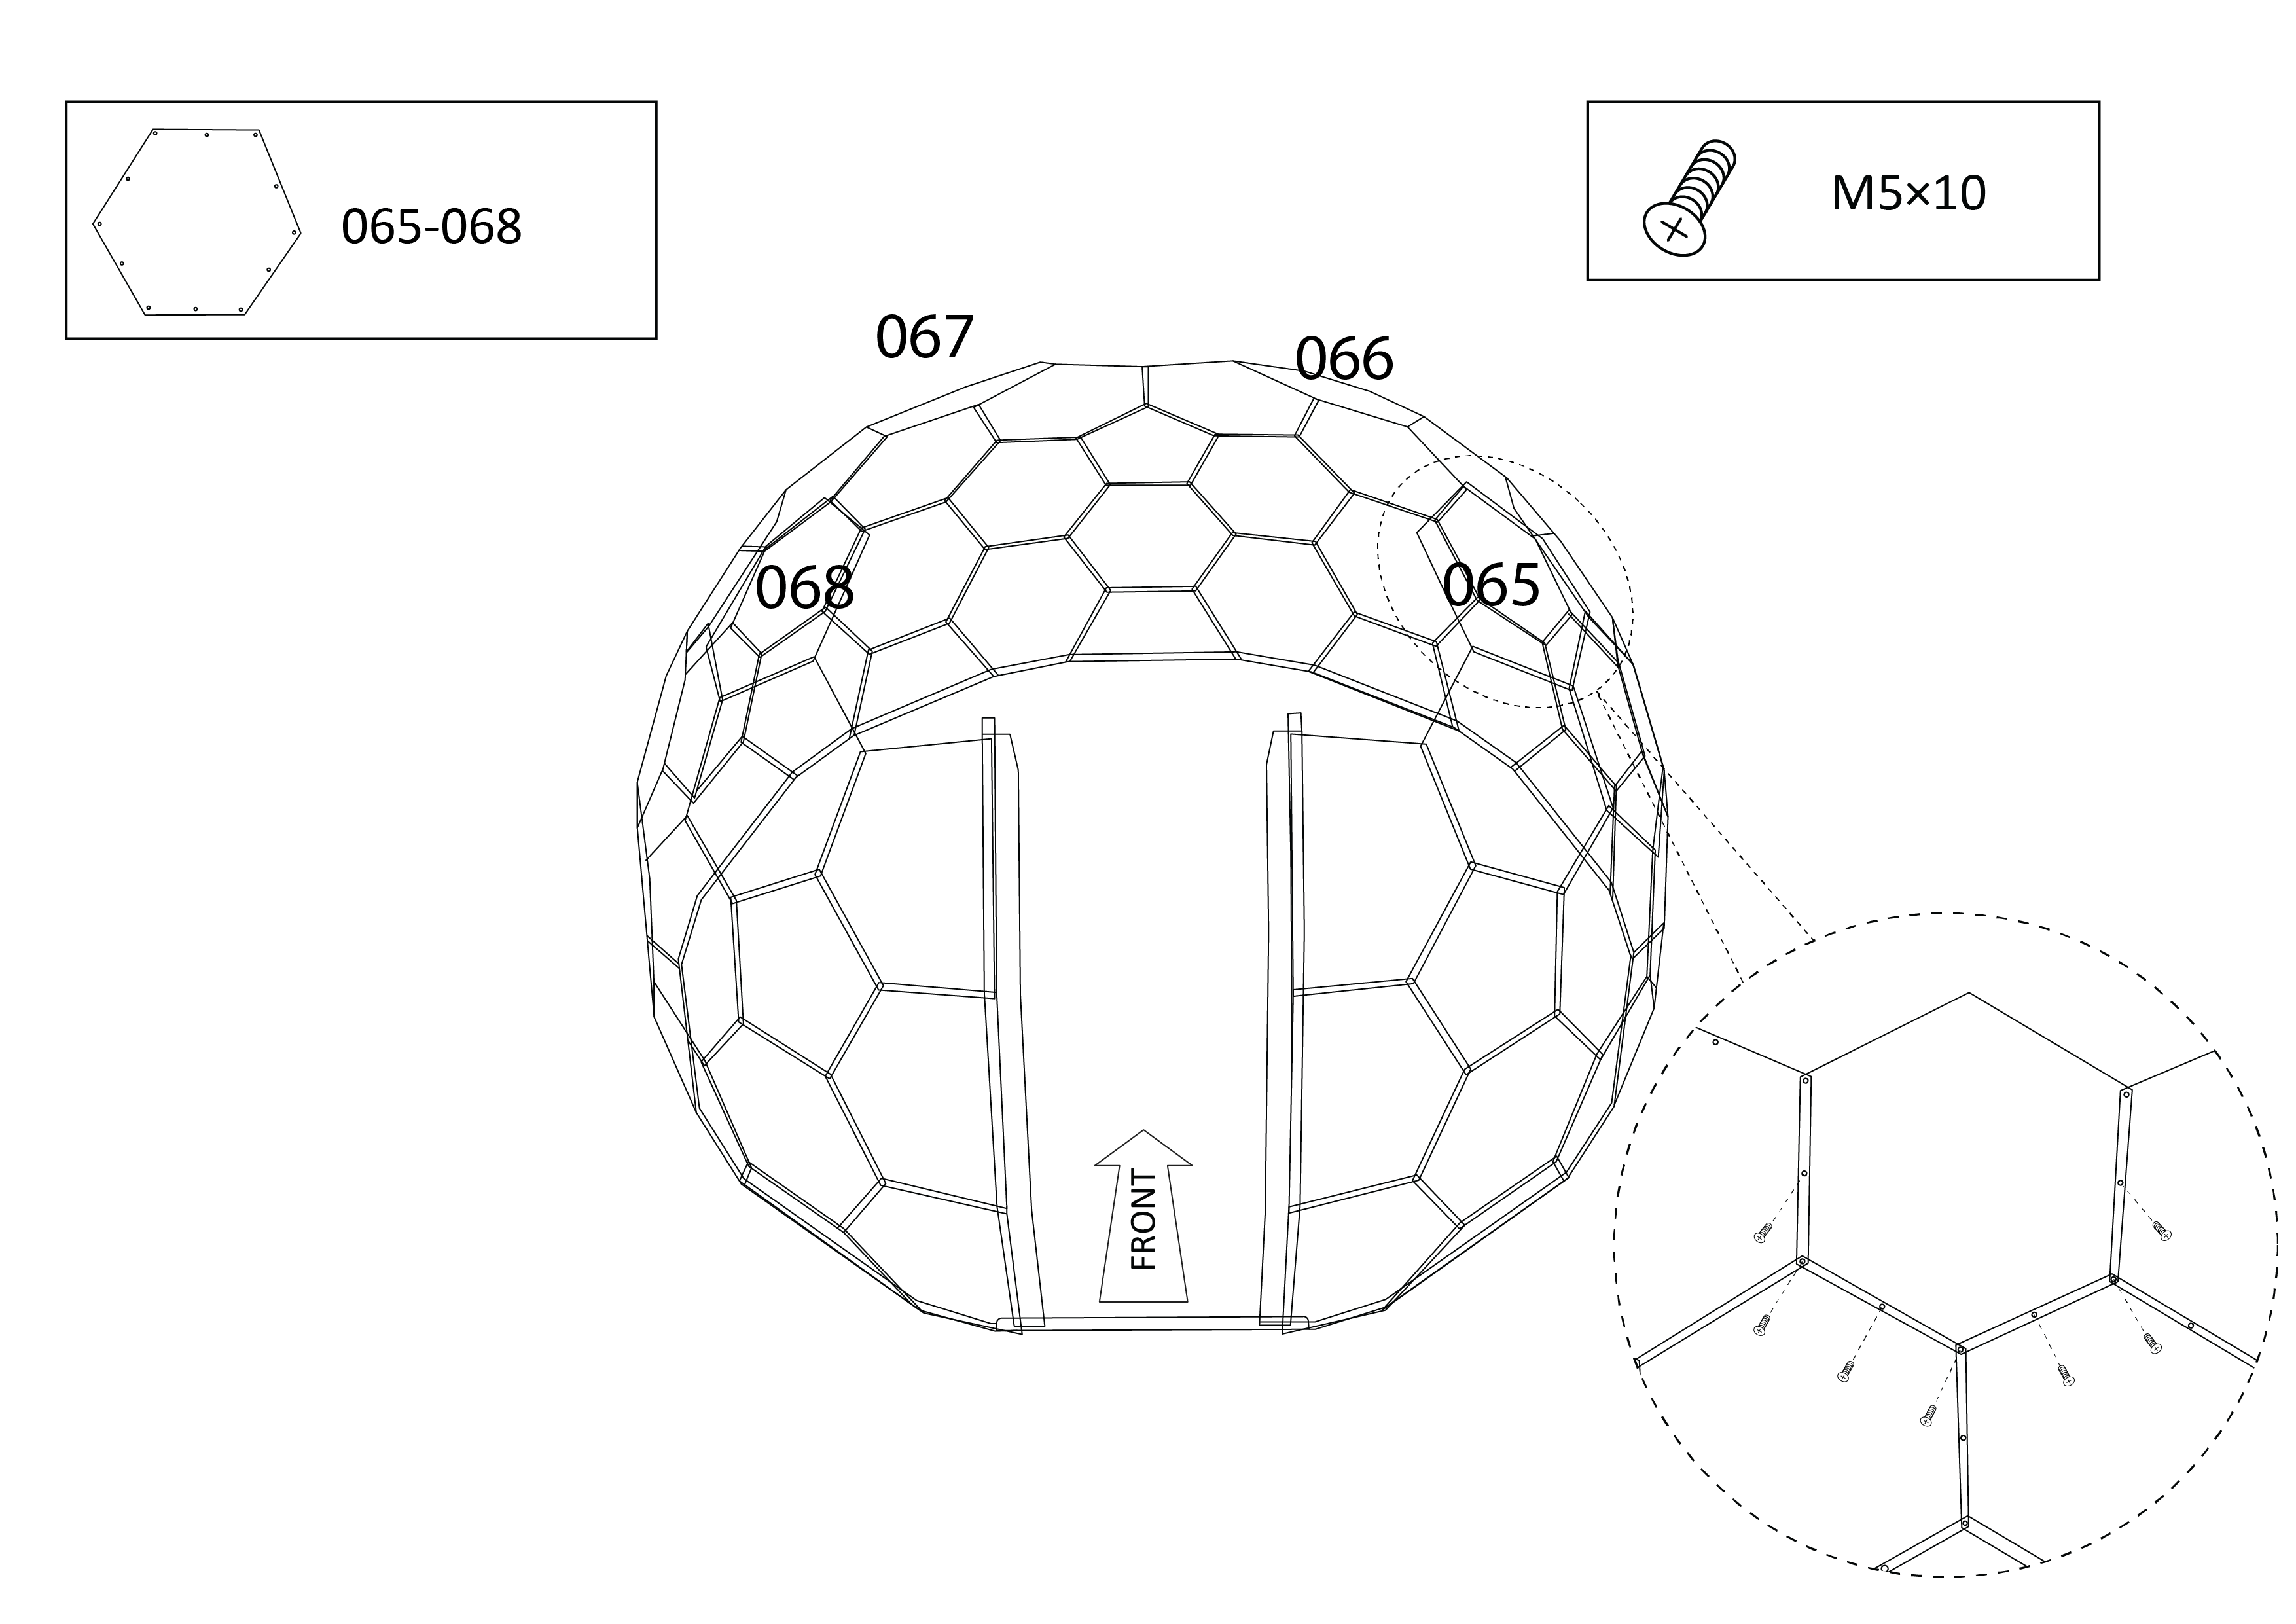
13. Attach panels 065-068 where shown.

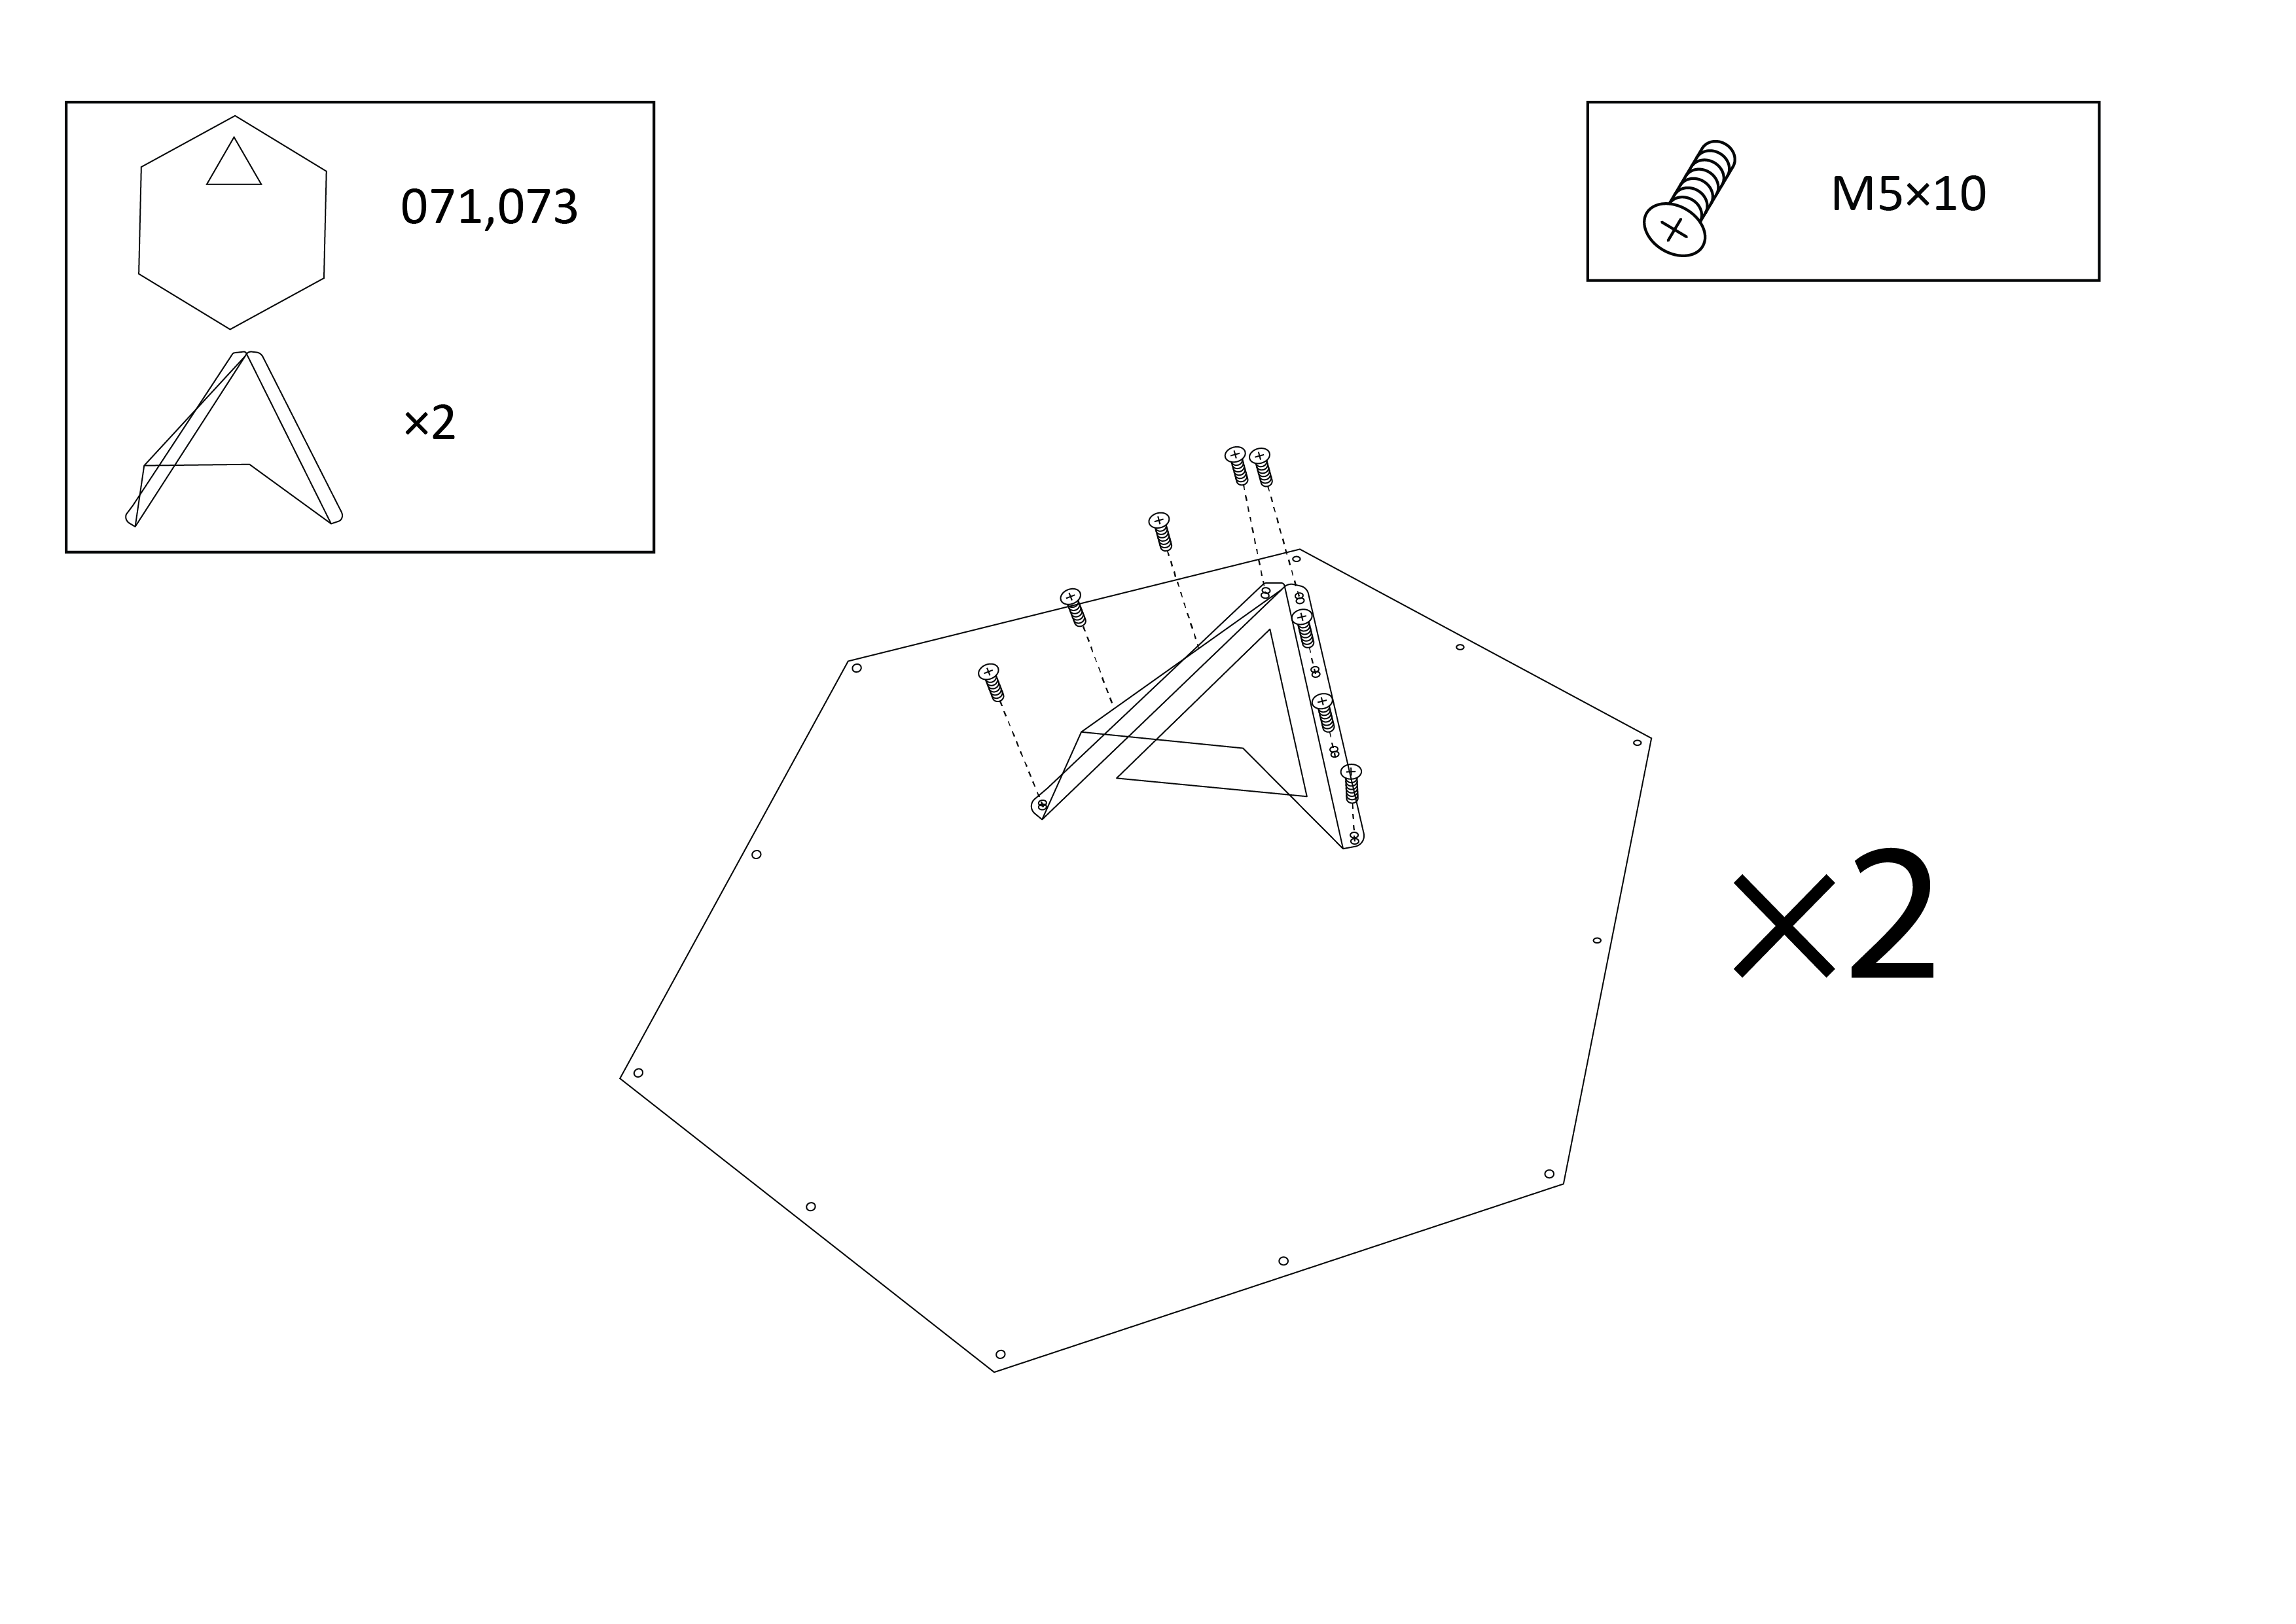
14. Prepare your window vent panels, numbers 071 and 073, ensuring you’re attaching the vents to the outside of the panel.

Tip: Secure the screws from the top of the vent, working downwards, bending the panel slightly if necessary.

15. Attach panels 070–074, including the vent panels you’ve just constructed.

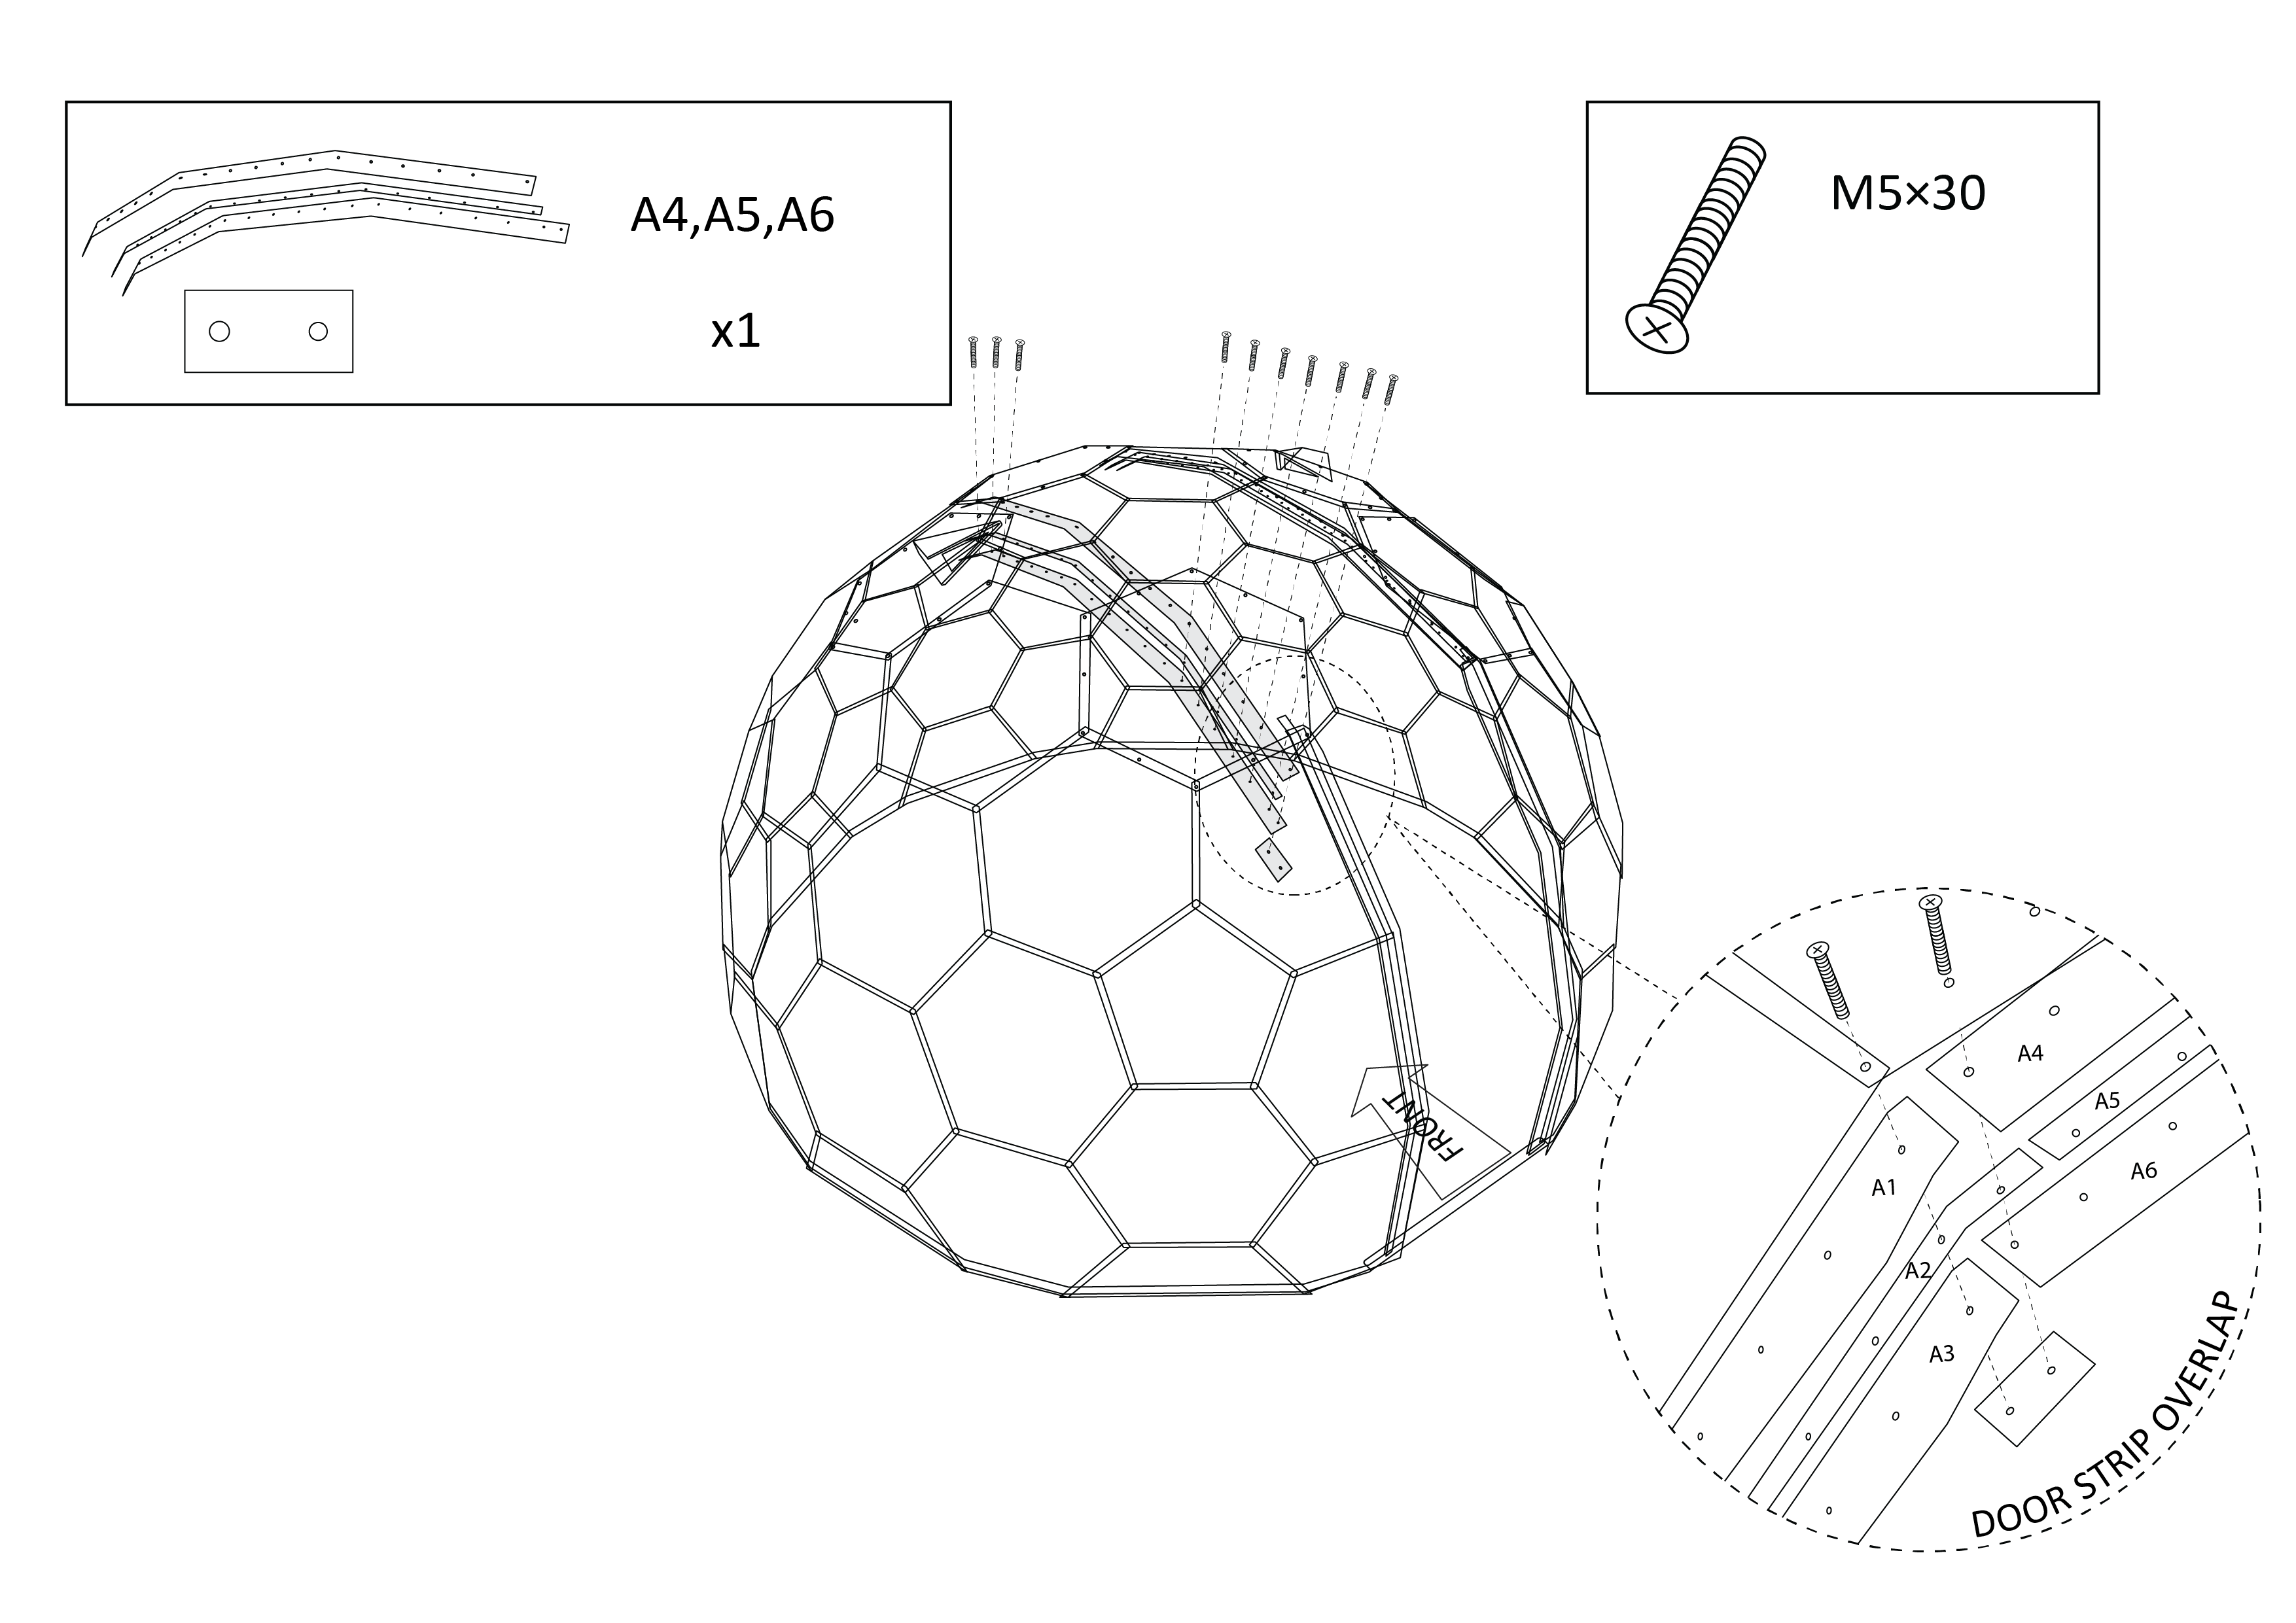
16. Prepare strips A4-A6 by placing them one behind the other with the numbers facing out, with A4 at the front. A5 is shorter than the others, allowing A2 to slot in between A4 and A6 when attached to the dome. Before securing this overlapped section, add the small rectangular piece aligned with the last screw hole of each strip. 

NB: Use long screws here.

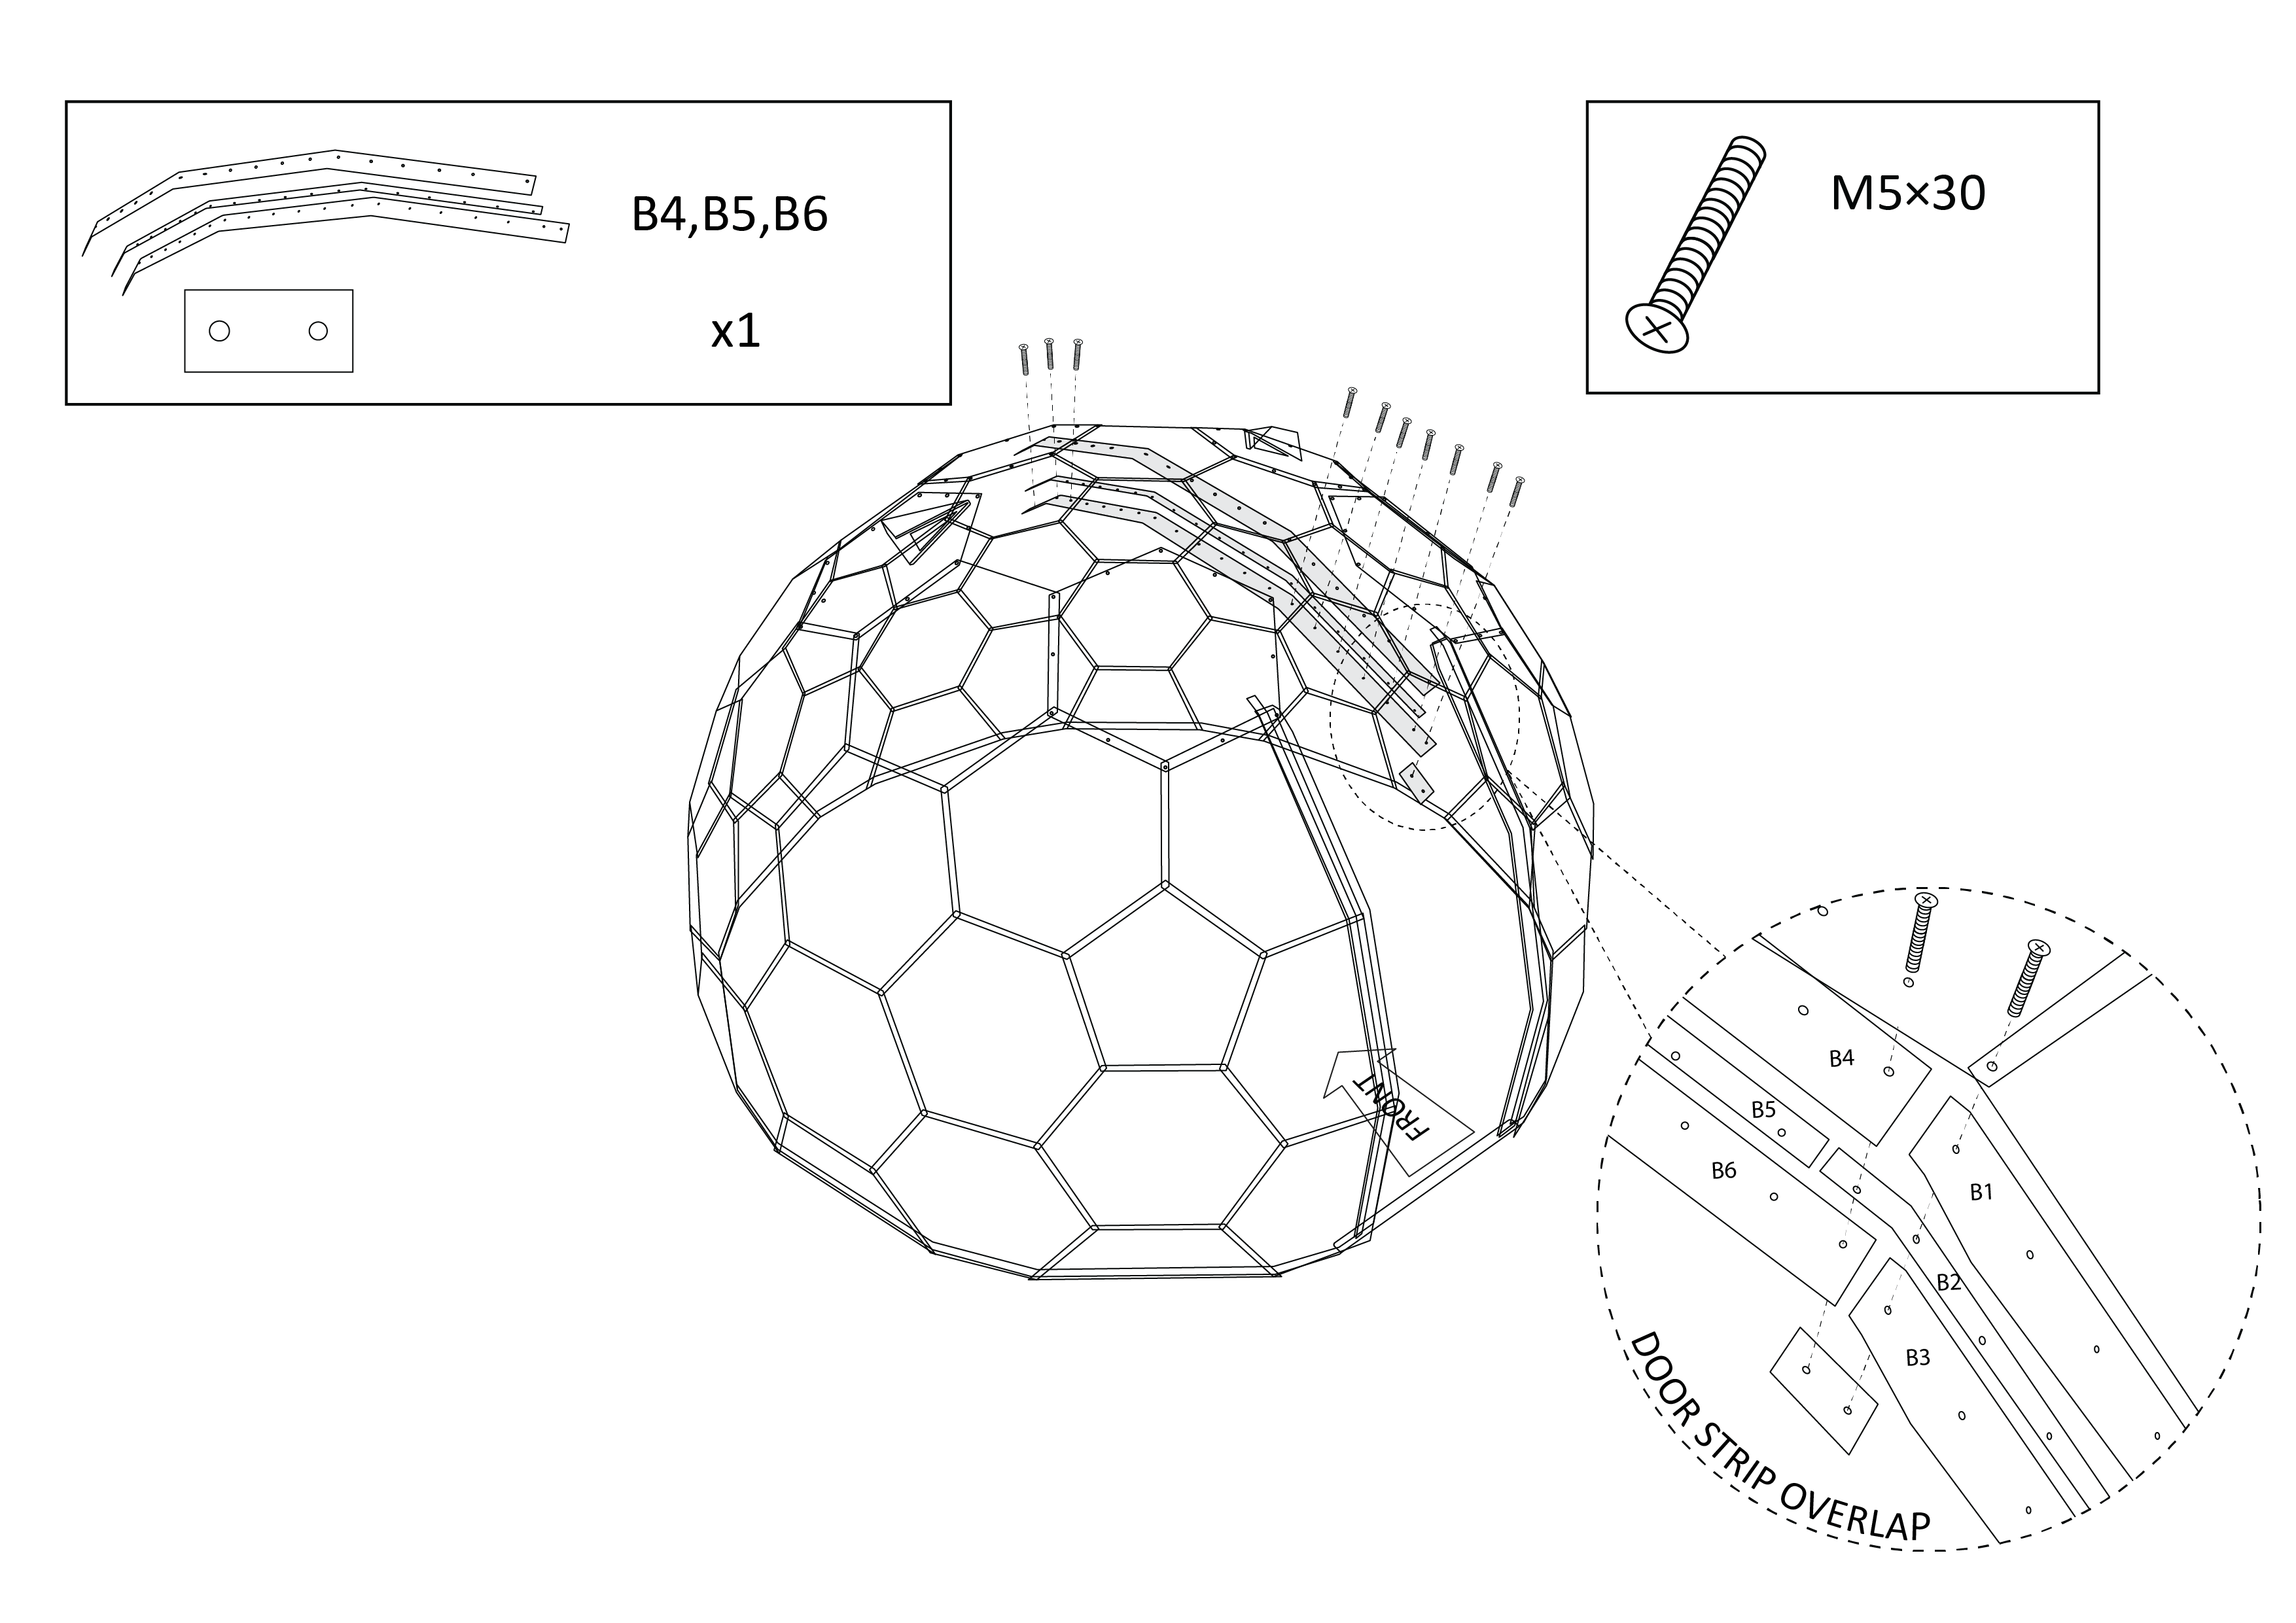
17. Repeat this process again on the right side of the door with strips B4-B6.

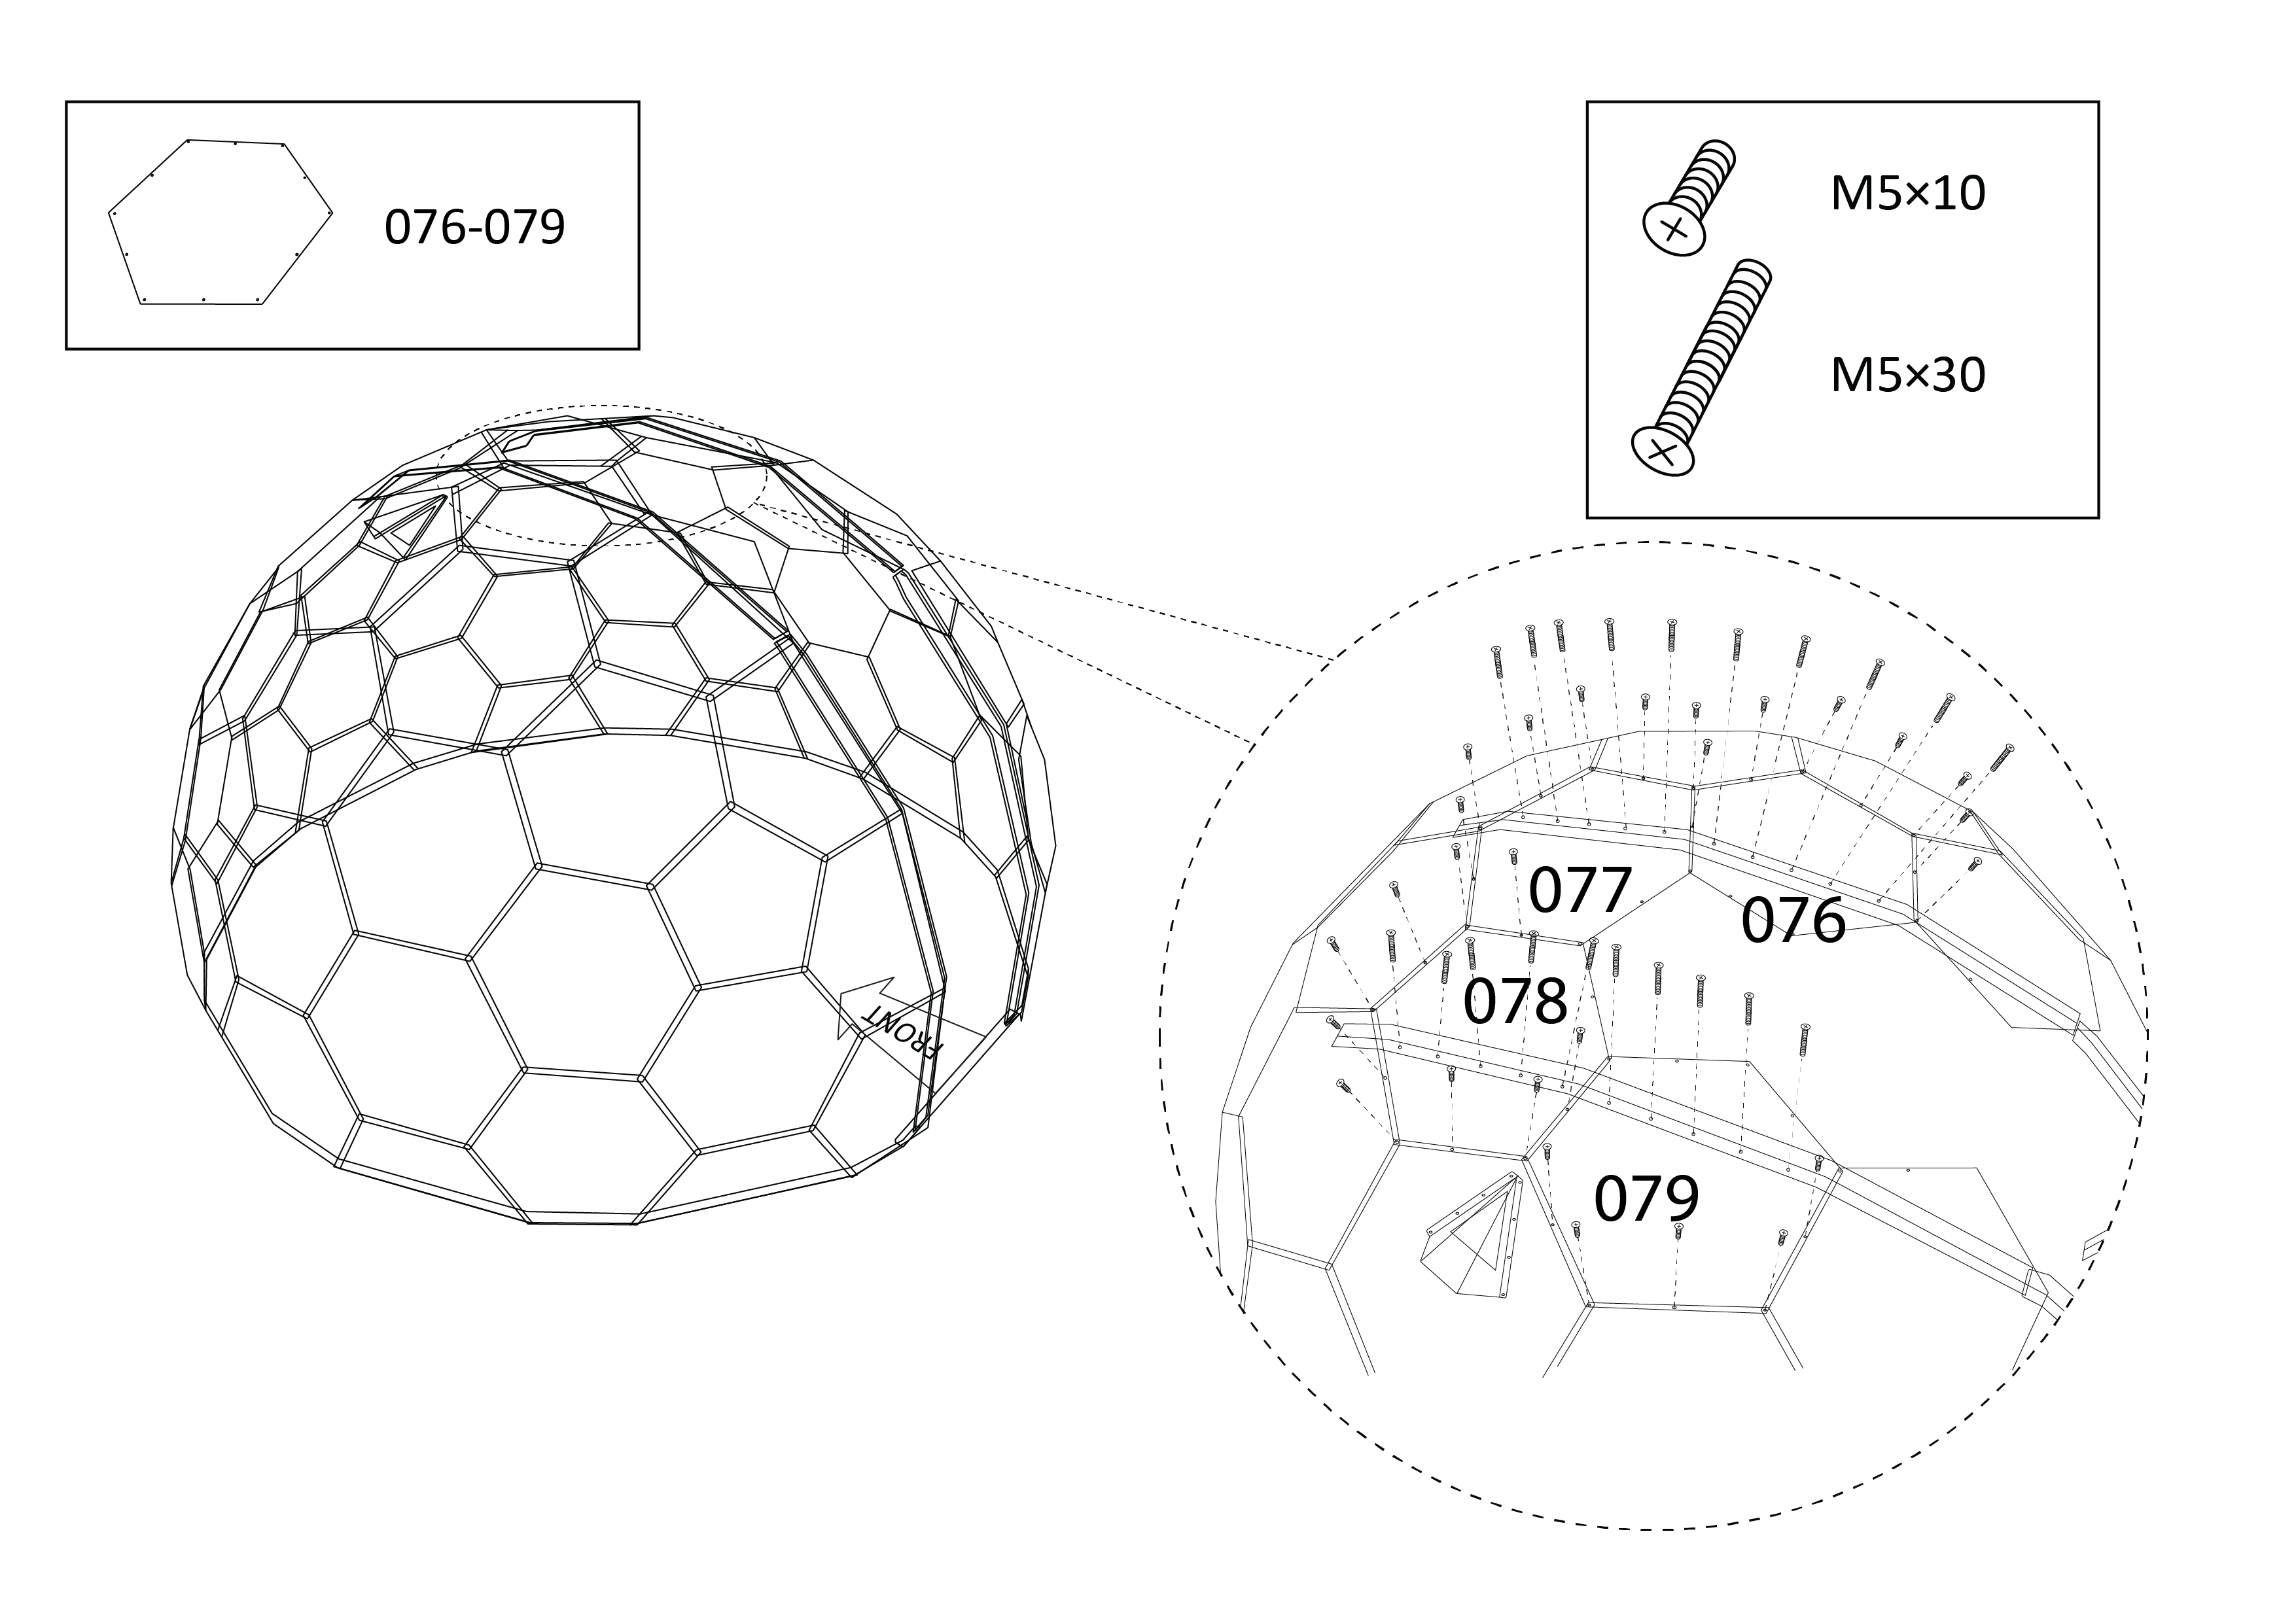
18. Add panels 076-079. Make sure that the panels are placed over the top of the door strips.

NB: Use short screws except where the panels are attached to the door profile.

19. Attach panel 080 at the very top of the dome.

20. Attach your final flat panel, 075, ensuring the top is slid under the bottom of panel 080. You’ll notice that door strips A4 and B4 cover the bottom of two of the holes. Attach a small screw through these holes as normal (you will need to loosen the door strips a little to allow you to do this) and secure with a nut. A4 and B4 will cover this nut. You can then proceed to retighten the door profile screws.

NB: For panel 075, it can get confusing as to which holes secure to the door profiles, and which don't. This area is designed to be attached as follows:

Attach panel 075 to the neighbouring hexagonal panels (ignoring the door profiles) with a short screw, as you have before.

Then move the door profiles underneath this so that it covers up the bottom of the small screw. You can then attach the long screw through the panels and the door profiles.

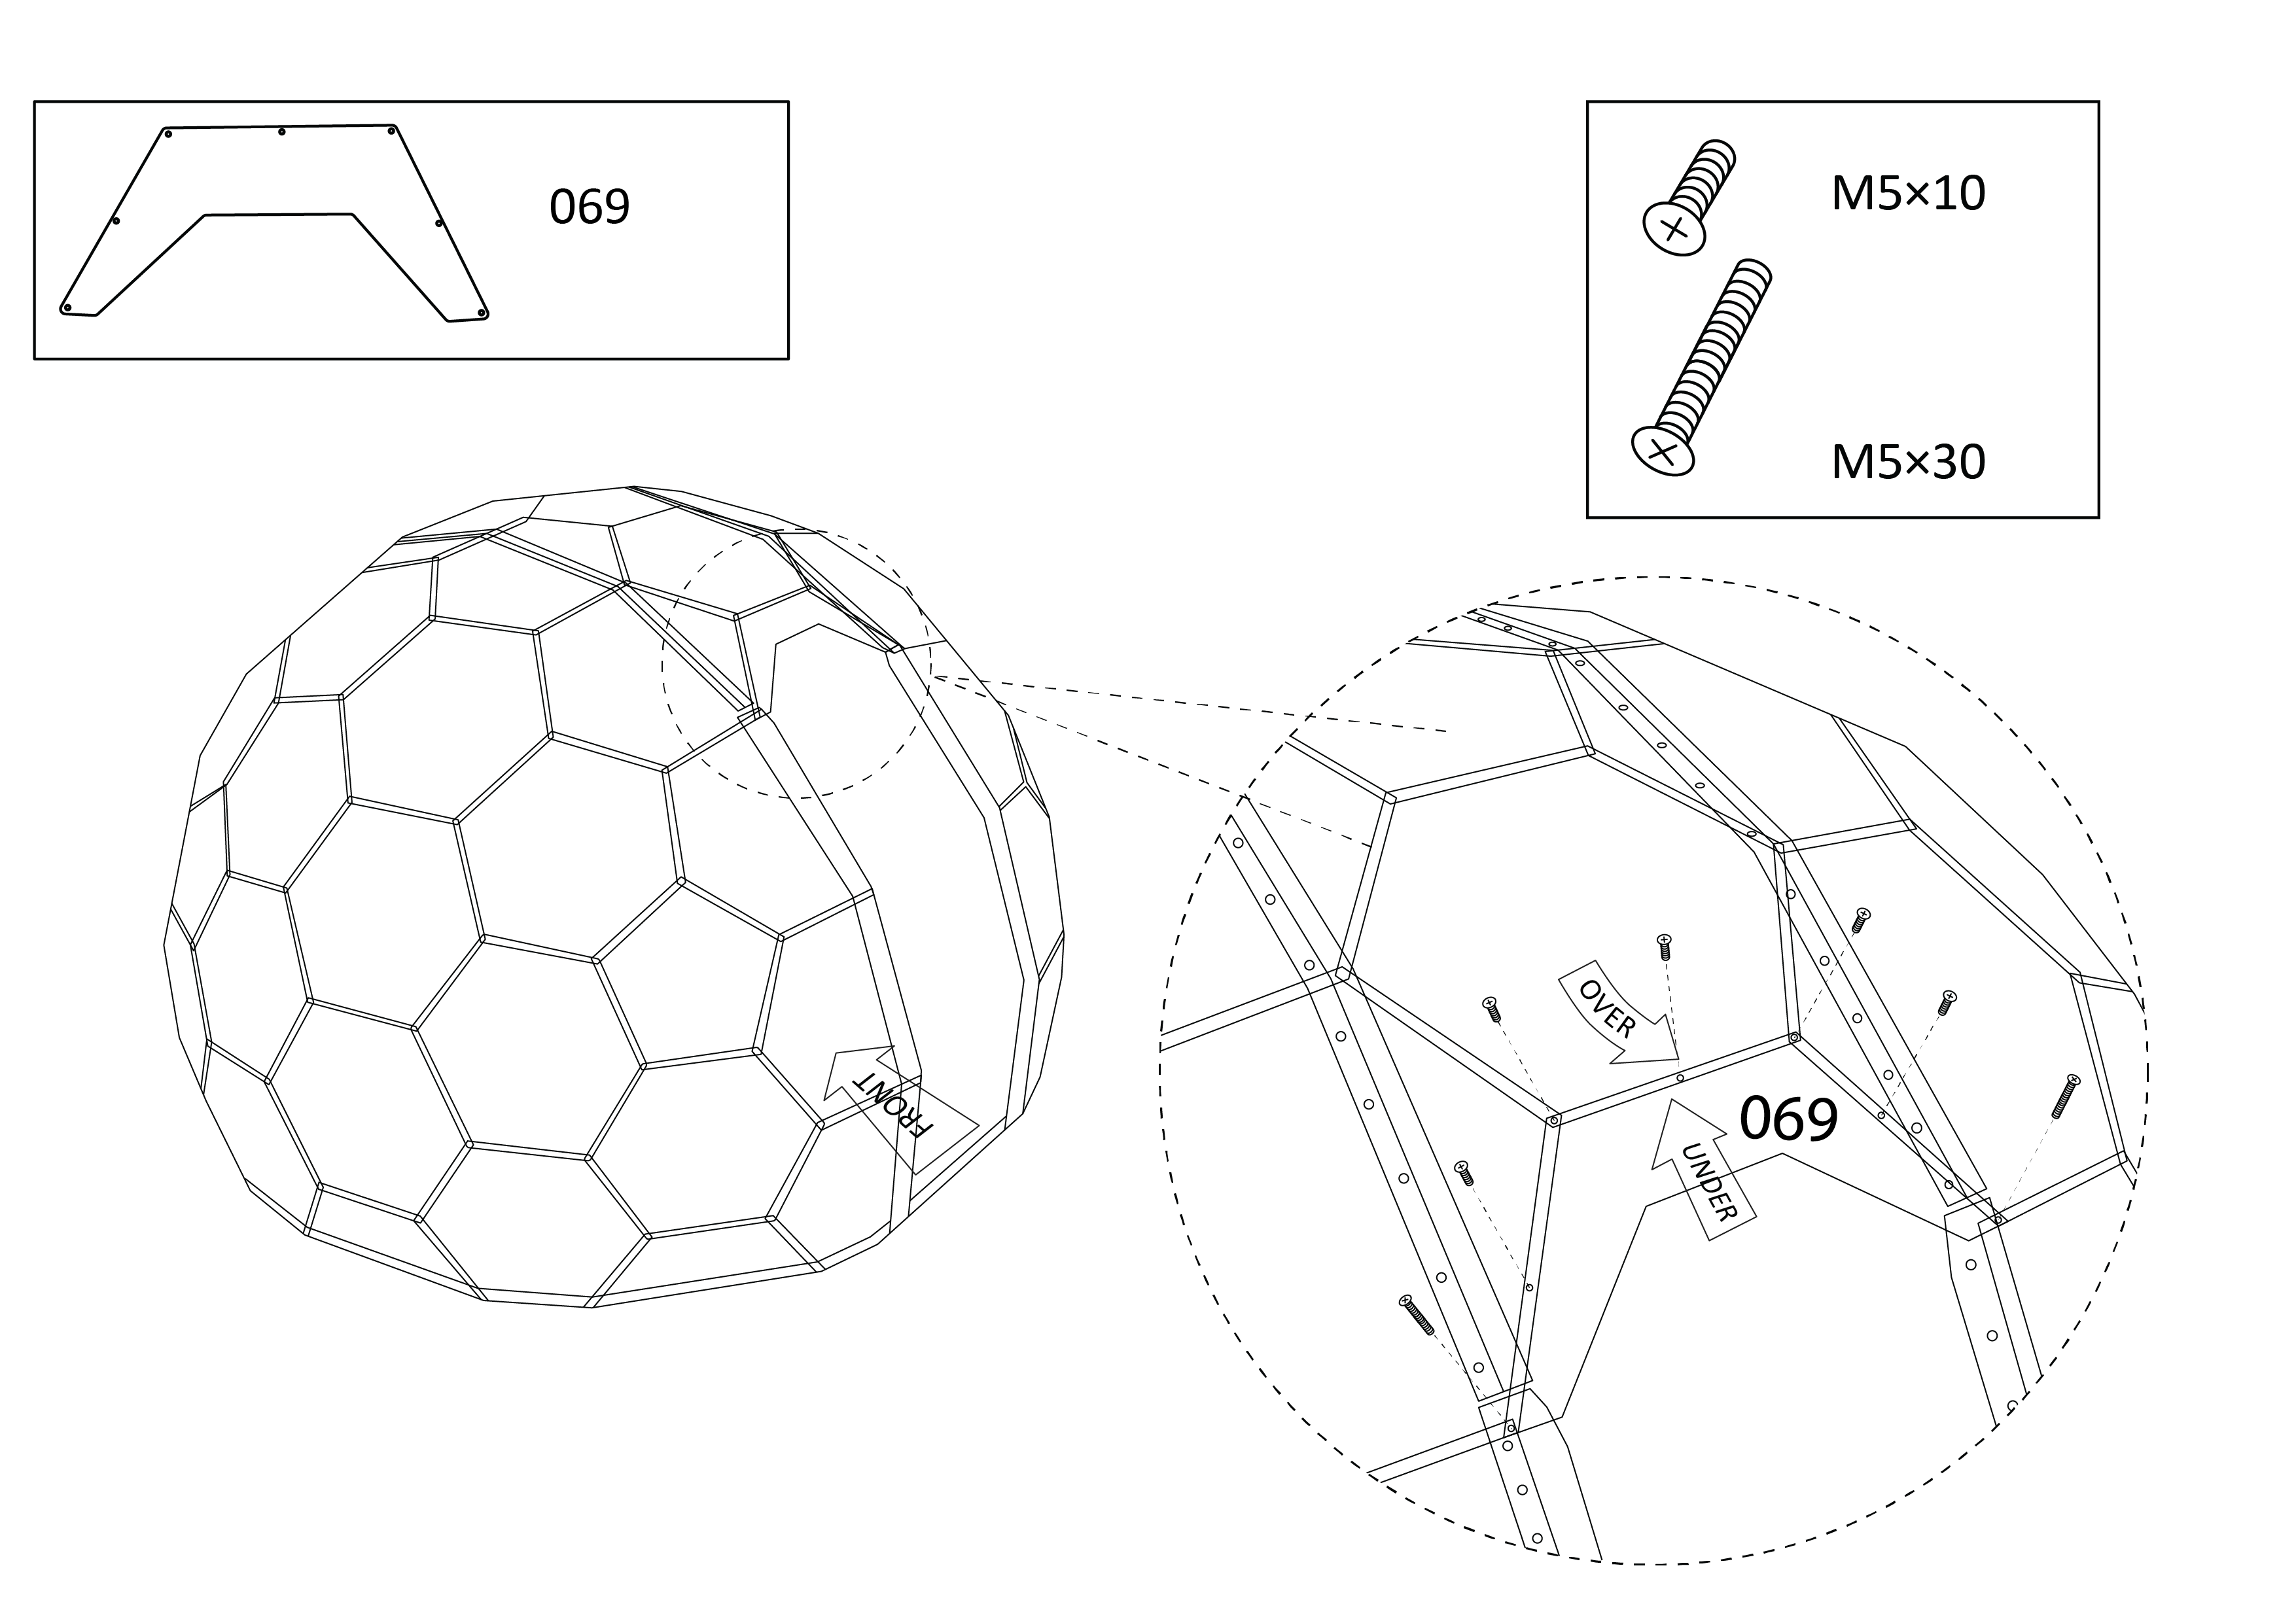
21. Secure panel 069 to the outside of the door frame, again ensuring that the top is slid underneath the bottom of 075.

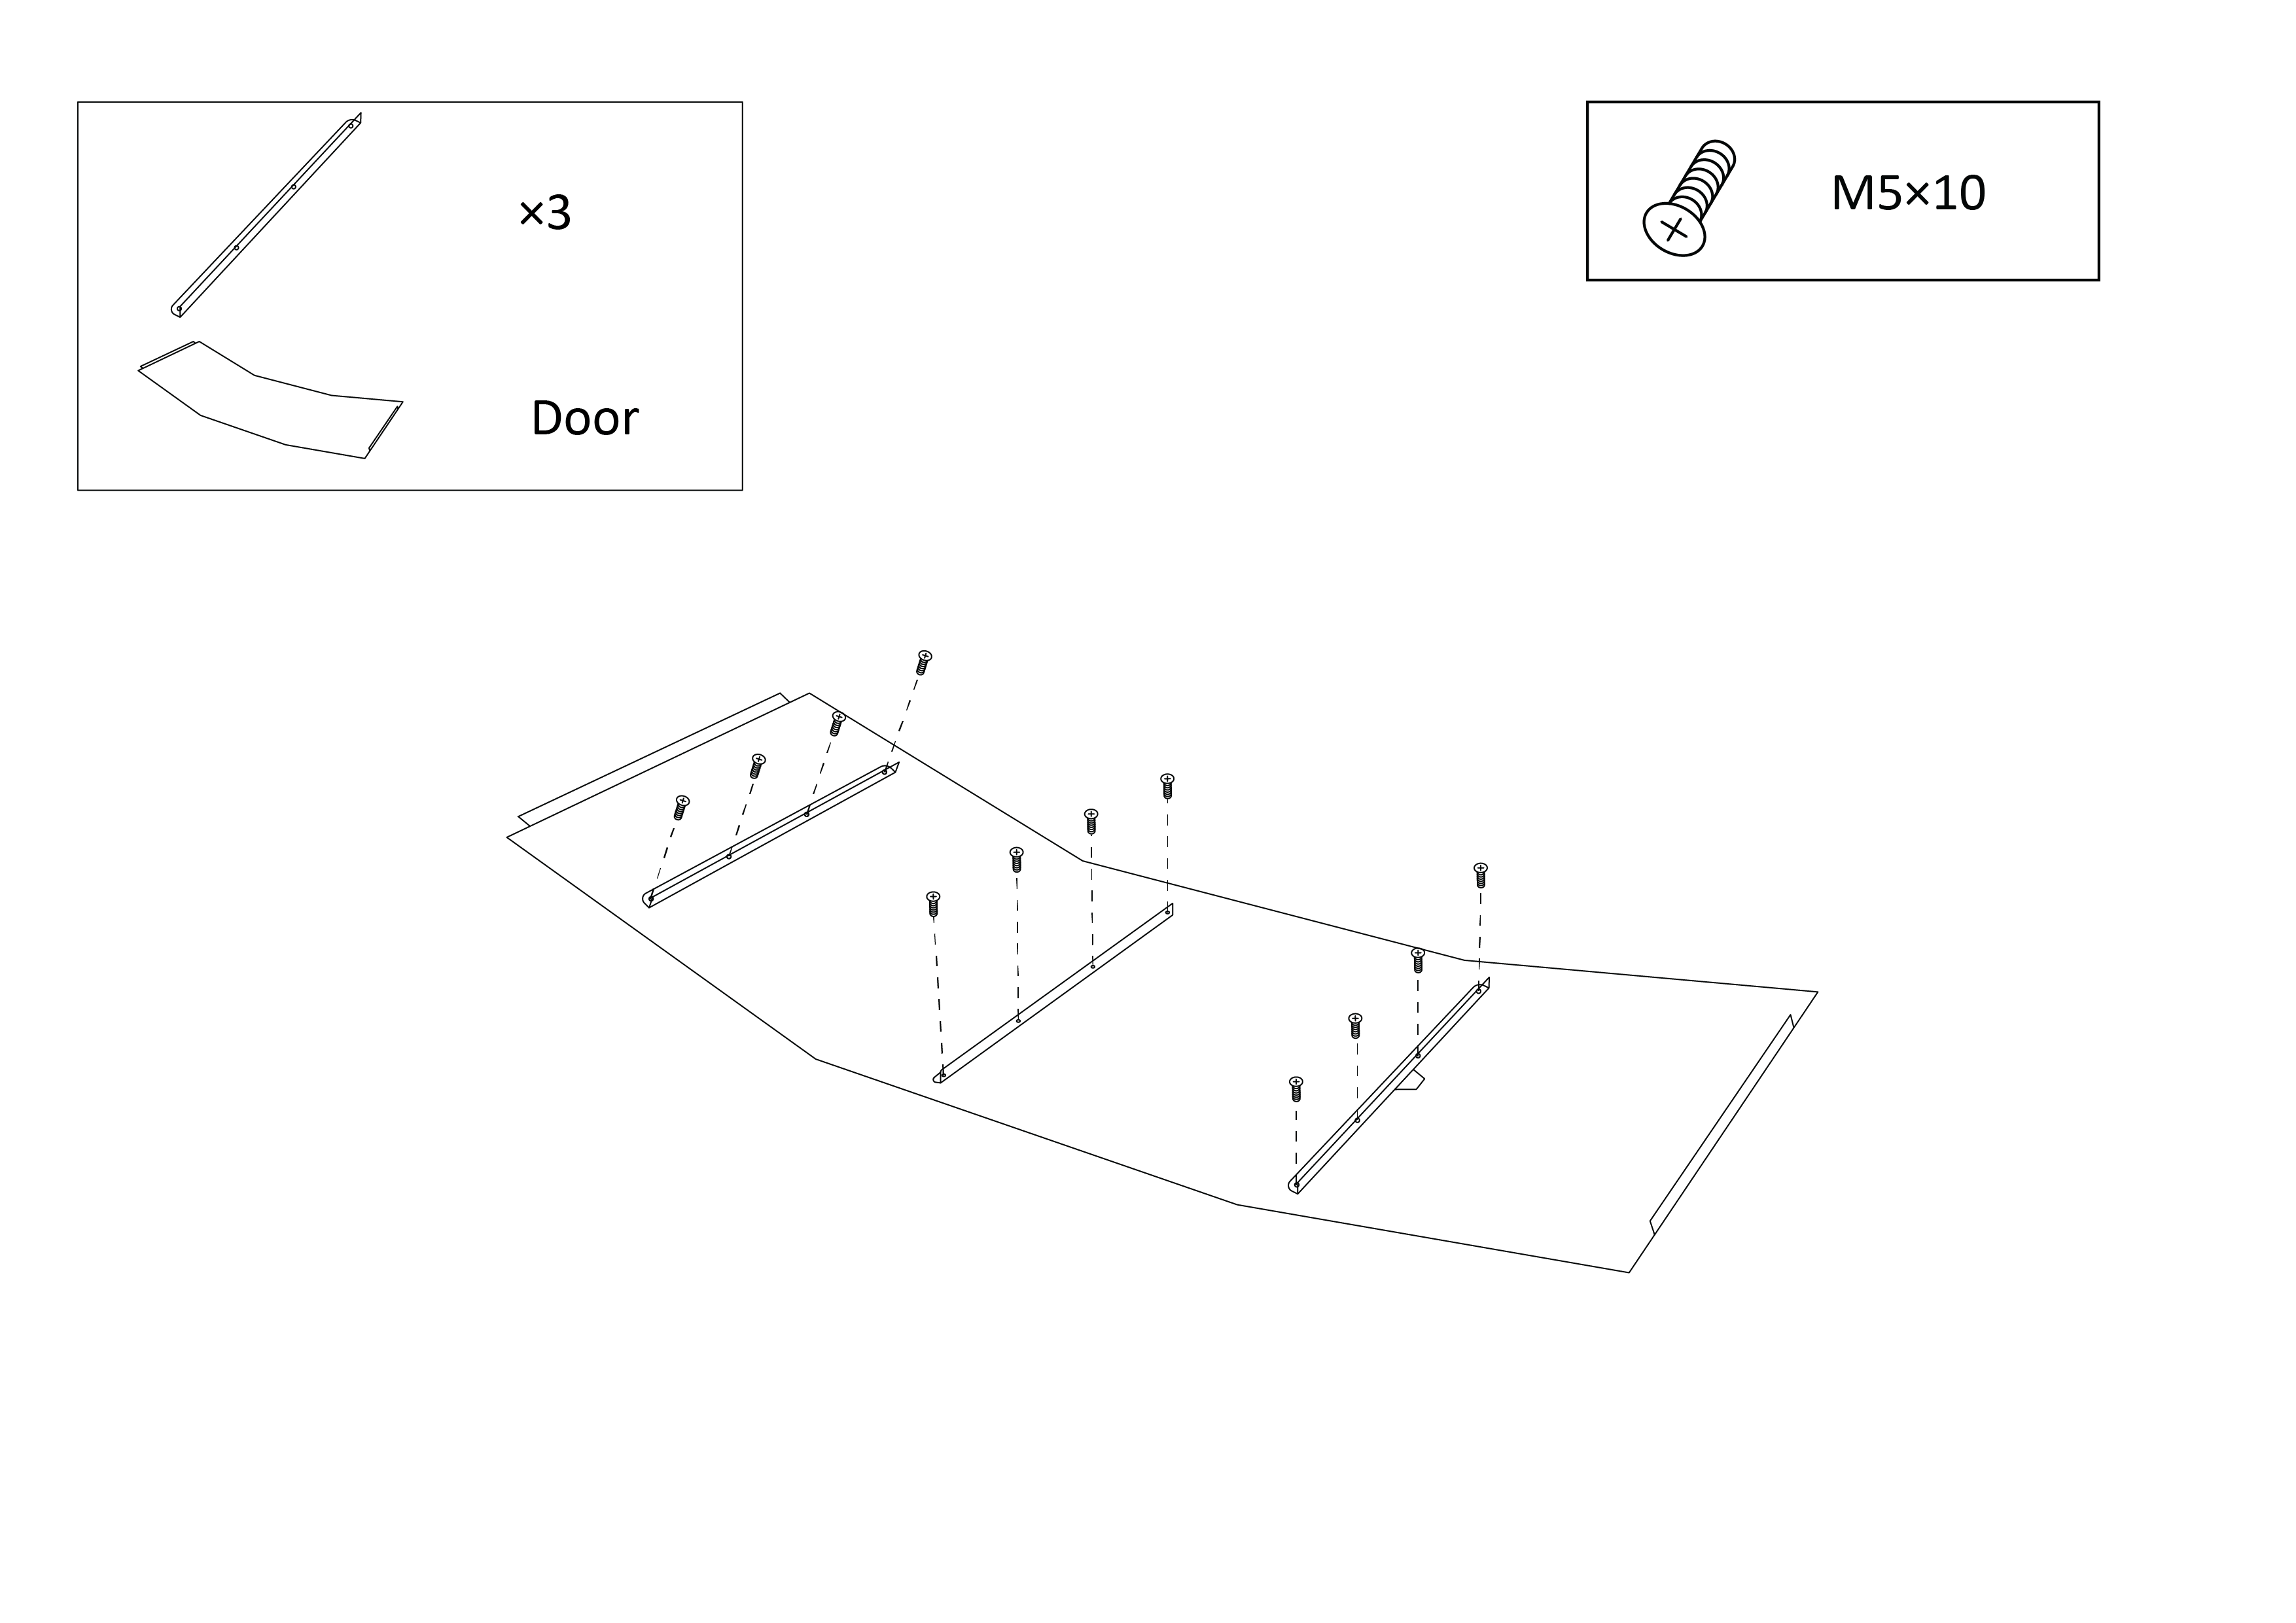
22. Prepare the door by attaching the crossbars using the small screws.

23. Slide the door in from the back of the dome, pulling it forward and into place. This completes the assembly of your GeoDomeX.

Title

Anchoring

How to attach the dome to the ground.

Once you have assembled your GeoDomeX, the following guide takes you through the step-by-step process of anchoring your dome to the ground. You will need to choose the best anchoring method based on your situation considering your sites ground type and wind conditions. Please note, GeoDomeX will need to be anchored to the ground using one of the following approved anchoring methods in order to qualify for its warranty. If you need any support with the anchoring of your dome, you can get in touch with us. We’re more than happy to help talk you through the process.

Anchoring for best door function

Top-down anchoring diagram of the dome base ring: 350cm left to right, 342cm back to front, door at the front

Anchor at 350cm left to right across the dome and 342cm back to front for the best door function.

Maximum tension equals the tightest door operation without falling out, looser anchoring means easier sliding. Silicone spray can also be used to ease operation.

Troubleshooting

If after you have anchored your dome you are finding common issues like the door not functioning correctly (falling out or sticking), or bulges in the domes shape, the following checks should help to solve any issues:

Ensure the ground is level all the way around the domes circumference making sure there are no raised or sunken areas in the floor effecting the domes shape.

Ensure the inside diameter of the dome is 350cm from opposite sides, left to right.

Ensure the inside front to back diameter of the dome is 342cm.

If the door is still sliding too freely or is gripping too much, unscrew/un-pin part 007 (the doorway threshold) and move it in or out slightly before re-screwing/repinning. This helps to reangle the door profiles, loosening or tightening the door as needed.

Title

Aftercare

How to look after your dome.

Looking after your GeoDomeX is easy, with little to no maintenance needed over the years. This guide takes you through all the information you need to know regarding cleaning, maintenance and care for your dome, ensuring GeoDomeX lasts you a lifetime.

Looking after your dome video

Alt image

Watch the video walkthrough to find out all you need to know about how to care for and maintain your dome.

Video Chapters

00:09 - Prevention

00:35 - Microfibre Wipe Down

00:50 - Hose Down

Prevention

The first step to maintaining your GeoDomeX is prevention. Keeping the space above your dome free from overhanging branches is a simple way to reduce any build up that may occur. We also recommend keeping the windows and doors closed when not in use.

Cleaning

GeoDomeX can be cleaned easily using a soft micro fibre cloth and a mild detergent. Generally any mild soap or cleaner suitable for windows is best. If in doubt, check the label and ensure the product can be used on plastic, testing on an inconspicuous area of the dome first. Alternatively you can use a garden hose or a pressure washer (on the lowest setting) to hose down any stubborn marks.

Never use abrasive cleaners or cloths to clean GeoDomeX as this can lead to scratching.

Storing or relocating

Whilst GeoDomeX is designed to withstand conditions all year round and does not need to be stored away during the winter, we know that there may be instances where your would want to dis-assemble or relocate your GeoDomeX to a different location. GeoDomeX can be easily disassembled, following the assembly instructions in reverse. If just moving the dome, it is possible to lift it from multiple points around the base with some helpers, without having to take the dome apart.

Title

Have A Question?

Ask a member of our team.

Live Chat

Live Chat

Connect with an expert instantly for immediate assistance for any queries or concerns you may have.
Available daily from 9am to 5pm.

info@geodomex.co.uk

Email Us

If you have a question or would like to discuss your specific case send us an email by filling out the form below. We aim to reply to all emails within 12 hours.